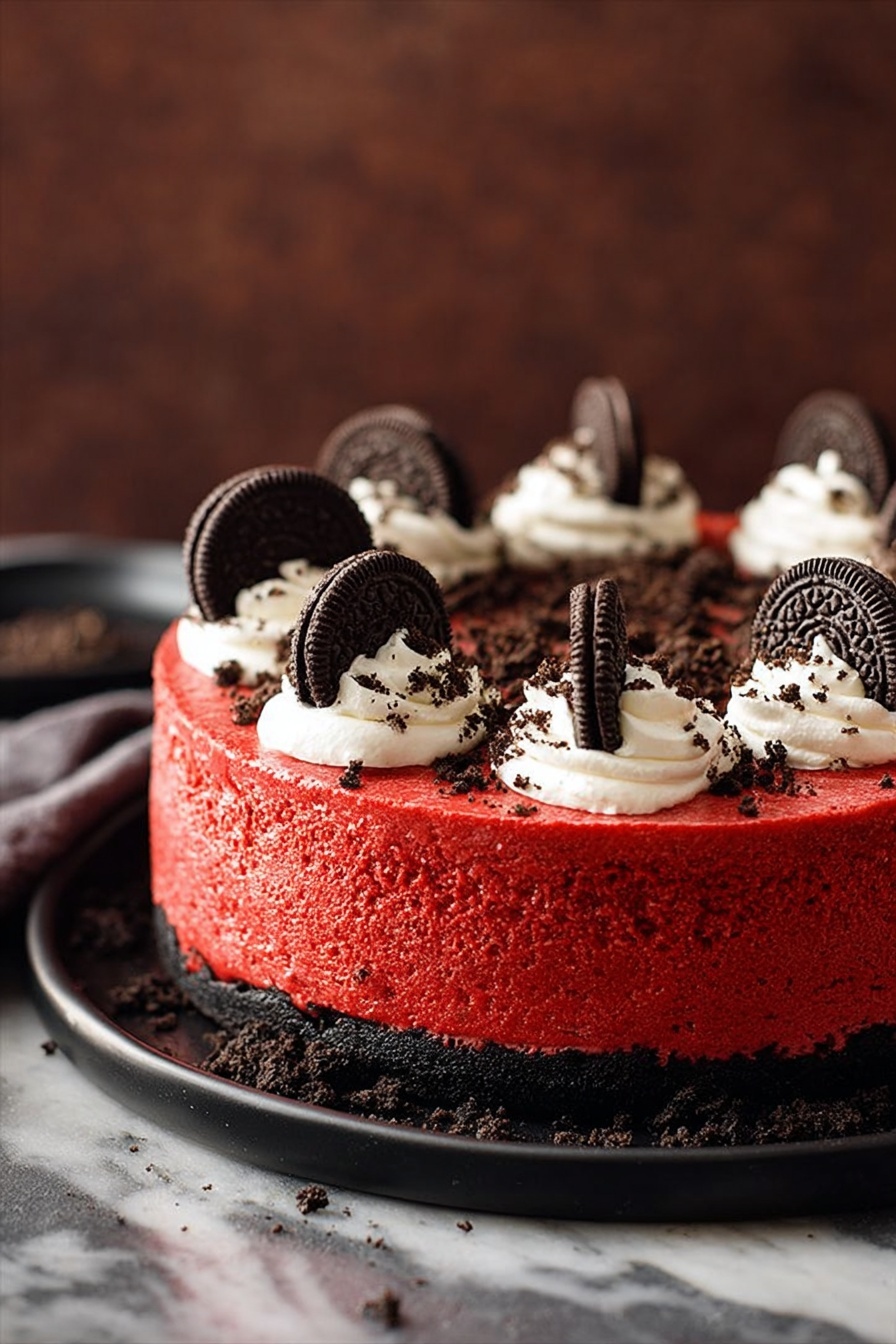
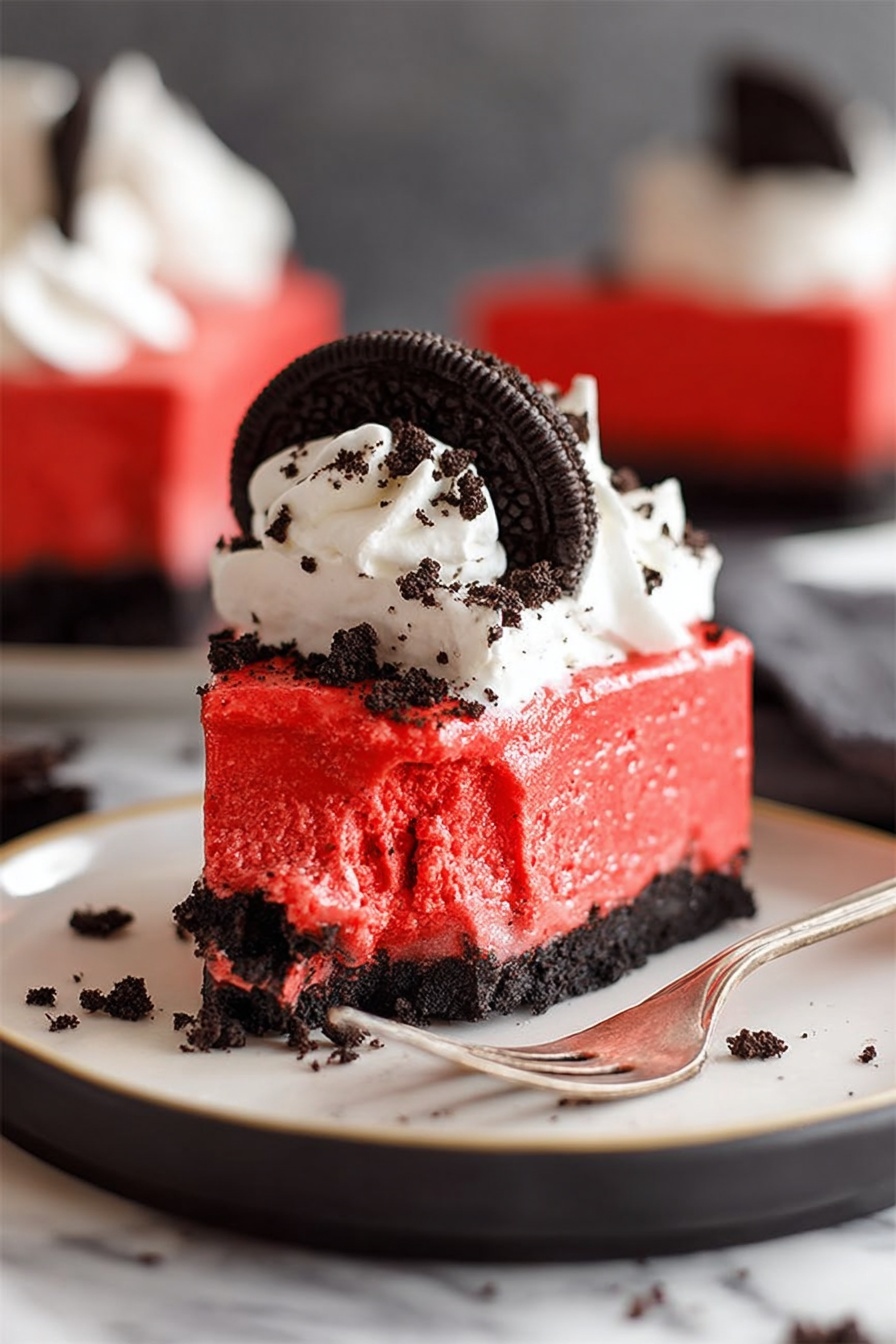
There's something utterly irresistible about the combination of a rich, creamy cheesecake infused with that deep red velvet flavor and crunchy Oreo bits folded right in. This Red Velvet Oreo Cheesecake Recipe brings all those cravings to life with a stunning dessert that's as fun to make as it is to eat.

Jump to:
Why You'll Love This Recipe
I vividly remember the first time I baked this Red Velvet Oreo Cheesecake Recipe for a holiday gathering. The look on everyone's faces when I brought it out? Pure joy. It's more than just dessert; it's a conversation starter, a showstopper, and truly, one of those recipes where the taste lives up to the gorgeous red hue.
- Decadently Rich Flavor: The marriage of classic red velvet cocoa notes with cream cheese smoothness creates a luscious bite every time.
- Perfect Oreo Crunch: The chocolate sandwich cookie crust adds a delightful texture contrast that makes this cheesecake extra special.
- Impressive Yet Simple: Despite looking fancy, this recipe is straightforward and manageable—even if it’s your first cheesecake.
- Great for Any Occasion: Whether holidays, birthdays, or just because, it’s a dessert that brings everyone together.
Ingredients & Why They Work
Each ingredient in this Red Velvet Oreo Cheesecake Recipe plays a crucial role in building that perfect texture, vibrant color, and incredible flavor. I always recommend grabbing the freshest cream cheese and checking your food coloring quality to ensure that bright red pop we all love.

- Chocolate sandwich cookie crumbs: Oreo crumbs make the crust irresistibly chocolatey and crunchy, setting the stage for the cheesecake.
- Unsalted butter: Melted and mixed with Oreo crumbs to bind the crust firmly without overwhelming the flavor.
- Full-fat cream cheese: The star ingredient that gives the cheesecake richness and that smooth, creamy texture—never use reduced-fat or whipped.
- Granulated sugar: Sweetens the cheesecake just right without being too overpowering.
- Full-fat sour cream: Adds a subtle tang and keeps the cheesecake moist and tender.
- Eggs: These help bind all the ingredients and provide structure so the cheesecake sets perfectly.
- Unsweetened cocoa powder: This gives the subtle chocolate depth that’s essential for red velvet flavor.
- Liquid red food coloring: The hallmark of red velvet — I personally prefer McCormick brand for vibrant, consistent color.
- Vanilla extract: A hint of vanilla enhances all the flavors, making them pop beautifully.
- Cream Cheese Whipped Cream: Perfect for topping—it’s light, creamy, and complements the cheesecake's density.
Make It Your Way
I love how adaptable this Red Velvet Oreo Cheesecake Recipe is. Over time, I’ve tweaked toppings and textures to suit different occasions and tastes—feel free to get creative and make it truly yours!
- Variation: One of my favorite twists is adding extra chopped Oreos into the batter for surprise chunks throughout the cheesecake—it’s a fun texture surprise that your guests will love.
- Dairy-Free Modification: For friends with dietary needs, swapping full-fat cream cheese with a dairy-free cream cheese alternative works well, just be sure to chill longer for firming.
- Seasonal Flair: Around the holidays, sprinkling edible glitter or red and white sugar pearls on top adds a festive spark that really brightens the table.
Step-by-Step: How I Make Red Velvet Oreo Cheesecake Recipe
Step 1: Prep the Crust Like A Pro
Preheat your oven to 325°F and wrap the outside of your 6x2 or 6x3 springform pan tightly with foil to prevent leaks—trust me, this step saved my kitchen counter more than once! Mix your Oreo crumbs and melted butter until everything’s evenly coated, then press the mixture firmly into the bottom of the pan. Baking it for 10 minutes before adding the filling keeps that crust crisp and delicious.
Step 2: Beat the Filling to Silky Perfection
Using a stand mixer with a paddle attachment or a hand mixer, beat the cream cheese, sugar, and sour cream together on medium-high speed until it's fluffy and light—this usually takes 2-3 minutes. Make sure to scrape down the sides frequently so there are no lumps. Next, add eggs one at a time, mixing each thoroughly but don’t overbeat as this can cause cracks. Finally, add cocoa powder, red food coloring, and vanilla, blending just until combined. You’ll notice the batter turn a beautiful vibrant red—this is where the magic happens.
Step 3: Bake in a Water Bath for Creamy Goodness
Pour the filling into your prepared crust and place the springform pan inside a larger pan. Carefully pour hot water into the outer pan until it reaches halfway up the side of the springform, just keep water out of the foil and pan interior. This water bath gently cooks the cheesecake, preventing cracks and ensuring a silky texture. Bake for 65-75 minutes—edges should be set and slightly browned, while the center jiggles just a little. An internal temp of 150°F is your green light. Let it cool gradually in the water bath to avoid sudden temp shocks.
Step 4: Chill and Finish
Once cooled at room temp for about an hour, cover and refrigerate the cheesecake for at least 4 hours, preferably overnight. This chilling time lets the flavors meld and the texture firm up beautifully. Just before serving, top with cream cheese whipped cream or your favorite frosting for that extra-touch of indulgence.
Top Tip
Making cheesecakes can feel intimidating at first, but these insights from baking my Red Velvet Oreo Cheesecake Recipe countless times will help you nail it with confidence—no cracks, no soggy bottoms, just pure deliciousness.
- Room Temperature Ingredients: Always let your cream cheese, sour cream, and eggs come to room temp before mixing. This ensures a smooth batter without lumps and prevents overmixing. I keep mine out for about an hour before starting.
- Don’t Overbeat the Eggs: Incorporate eggs one at a time and mix just until combined. Overmixing introduces air bubbles that can cause cracking during baking—the enemy of cheesecake perfection!
- Foil Wrap Your Pan Thoroughly: Wrapping the pan tightly in foil is key to preventing leaks in the water bath. I always double-wrap just to be safe, especially if it’s an older pan.
- Use a Water Bath: Evenly distributing gentle heat keeps your cheesecake creamy and prevents the dreaded cracked top. Try to pour the water slowly and keep it away from the cake batter side to avoid sogginess.
How to Serve Red Velvet Oreo Cheesecake Recipe
Garnishes
I usually go for a cloud of cream cheese whipped cream crowned with crushed Oreos for a hint of crunch. On special occasions, I add a few fresh raspberries or some chocolate curls for color and contrast—they’re not just pretty, they add a bright bite that balances the richness.
Side Dishes
Pairing this cheesecake with a light fruit salad, like citrus segments or a berry mix, really helps balance the richness and adds a fresh, zesty note to the dessert course. I also love serving it alongside a hot cup of coffee or spiced tea—it’s the perfect cozy combo.
Creative Ways to Present
For holiday parties, I’ve shaped individual mini cheesecakes in ramekins topped with crushed Oreos and edible gold glitter—talk about luxury! Alternatively, layering cheesecake slices in pretty dessert glasses with whipped cream and Oreo crumbs makes for a beautiful parfait-style presentation that's fun and unexpected.
Make Ahead and Storage
Storing Leftovers
Once your Red Velvet Oreo Cheesecake Recipe is chilled, store any leftovers in an airtight container or tightly wrapped with plastic wrap in your fridge. It stays fresh and creamy for up to 5-7 days, though I doubt it will last that long!
Freezing
I’ve frozen small slices wrapped well in parchment and foil before, and it works perfectly for later indulgence. Just thaw them slowly in the fridge overnight, and they retain their luscious texture without becoming watery or crumbly.
Reheating
Cheesecake isn’t best reheated, but if you like it a little warmer, I recommend taking a slice out of the fridge 30 minutes before serving to reach room temperature naturally. This softens the texture and brings out the flavors without compromising the creamy consistency.
Frequently Asked Questions:
Absolutely! While Oreos add that classic chocolate flavor, you can use other chocolate sandwich cookies or even graham crackers for a different twist. Just make sure to finely crush the cookies and mix well with melted butter for a firm crust.
Using room temperature cream cheese, eggs, and sour cream helps everything blend smoothly. This prevents lumps in the batter and reduces the risk of overmixing, which can cause cracks in your cheesecake after baking.
Yes! This recipe works well in a 7-inch springform pan without adjustments. For bigger pans like 9-inch, you’ll need to modify the ingredient amounts and baking times. Check my notes below the recipe for specifics on scaling up.
The key is a gentle bake—using a water bath to keep the oven temperature stable and prevent sudden heat changes. Also, avoid overbeating the eggs and cool the cheesecake gradually in the water bath before chilling it in the fridge. Running a knife around the edges after baking helps prevent cracking as the cheesecake cools and shrinks.
Final Thoughts
This Red Velvet Oreo Cheesecake Recipe isn’t just another dessert in my collection—it’s a celebration of textures and flavors that never fails to impress. I always feel like I’m sharing a little bit of joy when I bring this treat to the table, and I hope you’ll experience that same happiness making and sharing it with your favorite people. It truly is worth every bit of effort and is such a delightful treat to enjoy year-round.
Print
Red Velvet Oreo Cheesecake Recipe
- Prep Time: 20 minutes
- Cook Time: 1 hour 15 minutes
- Total Time: 6 hours 35 minutes
- Yield: 6 servings
- Category: Dessert
- Method: Baking
- Cuisine: American
Description
Delight in this festive Christmas Red Velvet Oreo Cheesecake featuring a rich chocolate cookie crust and a creamy, luscious red velvet filling topped with whipped cream. Perfect for holiday celebrations and small gatherings, this cheesecake combines classic flavors with a vibrant holiday touch.
Ingredients
Crust
- 1 cup chocolate sandwich cookie crumbs, such as Oreo
- 2 tablespoons unsalted butter, melted
Cheesecake Filling
- 16 ounces full-fat cream cheese, room temperature and not cold to the touch
- ½ cup granulated sugar
- 2 tablespoons full-fat sour cream, room temperature and not cold to the touch
- 2 eggs, room temperature and not cold to the touch
- 1 tablespoon unsweetened cocoa powder
- 2 teaspoons liquid red food coloring (McCormick brand or similar)
- 1 teaspoon vanilla extract
Topping
- Cream Cheese Whipped Cream or Small Batch Whipped Cream
Instructions
- Preheat and Prepare Pan: Preheat the oven to 325 degrees Fahrenheit. Wrap the outside of a 6x2 or 6x3 springform pan with foil to prevent water from leaking in. Lightly grease the inside of the pan to ensure the crust and cheesecake release easily.
- Make the Crust: In a large bowl, combine the chocolate sandwich cookie crumbs and melted butter. Mix until evenly combined and press the mixture firmly into the bottom of the springform pan to form the crust. Bake the crust for 10 minutes to set it.
- Beat Cream Cheese Mixture: Using a stand mixer fitted with a paddle attachment or a hand mixer on medium-high speed, beat the cream cheese, granulated sugar, and sour cream together until the mixture is light and fluffy, about 2-3 minutes. Scrape down the bowl as needed to ensure even mixing.
- Add Eggs: Beat in the eggs one at a time, each for about 1 minute, until the mixture is smooth. Be careful not to overbeat to avoid incorporating too much air.
- Incorporate Flavorings: Scrape the bowl down again, then beat in the unsweetened cocoa powder, liquid red food coloring, and vanilla extract until fully blended into the batter, creating a rich red velvet color.
- Prepare Water Bath: Pour the cheesecake batter over the baked crust in the springform pan. Place this pan inside a larger 8x8 or bigger pan. Pour hot water into the outer pan until it reaches halfway up the sides of the springform pan, taking care not to let any water seep inside the foil wrap.
- Bake Cheesecake: Bake the cheesecake in the water bath for 65 to 75 minutes. The cheesecake is done when the edges are set and browned, the center mostly set with a slight jiggle, and the internal temperature reaches 150 degrees Fahrenheit.
- Cool Cheesecake: Carefully remove the cheesecake from the oven and run a knife along the edges to loosen it from the pan. Let it cool for 15 minutes in the water bath, then remove from the water and cool uncovered at room temperature for 1 hour.
- Chill Thoroughly: Cover the cheesecake and refrigerate it for at least 4 hours or preferably overnight to let it fully set and develop flavor.
- Serve: Before serving, top the cheesecake with cream cheese whipped cream or small batch whipped cream. Store leftovers in an airtight container in the refrigerator for 5 to 7 days.
Notes
- For a larger 9-inch cheesecake, use the 9 Inch Chocolate Cheesecake recipe but omit the chocolate, then add ¼ cup sour cream, 2 tablespoons cocoa powder, and 1 tablespoon red food coloring to achieve the red velvet flavor.
- To explore more small cheesecake recipes, consider trying the 6 Inch Cheesecake, Chocolate Cheesecake with Oreo Crust, Small Pumpkin Cheesecake, or Peanut Butter Cheesecake variations.
- If you love red velvet, also try related recipes such as Small Red Velvet Cake, Red Velvet Cupcakes, Red Velvet Sugar Cookies, and Red Velvet Bars for more festive treats.
- Ensure all dairy ingredients like cream cheese, sour cream, and eggs are at room temperature to prevent lumps and achieve a smooth batter.
- Use full-fat cream cheese and sour cream for the best rich and creamy texture; avoid fat-free or whipped alternatives which can affect consistency.
Nutrition
- Serving Size: 1 slice (approx. ⅙ of cake)
- Calories: 450 kcal
- Sugar: 35 g
- Sodium: 250 mg
- Fat: 30 g
- Saturated Fat: 18 g
- Unsaturated Fat: 10 g
- Trans Fat: 0 g
- Carbohydrates: 35 g
- Fiber: 1 g
- Protein: 7 g
- Cholesterol: 110 mg


Leave a Reply