There’s something about the rich blend of tender chicken, sweet peppers, and fresh tomatoes that just sings comfort food to me. This Braised Chicken with Peppers and Tomatoes Recipe delivers deep, homey flavors with minimal fuss—perfect for those evenings when you want a wholesome meal without standing over the stove forever.

Jump to:
- Why You'll Love This Recipe
- Ingredients & Why They Work
- Make It Your Way
- Step-by-Step: How I Make Braised Chicken with Peppers and Tomatoes Recipe
- Top Tip
- How to Serve Braised Chicken with Peppers and Tomatoes Recipe
- Make Ahead and Storage
- Frequently Asked Questions:
- Final Thoughts
- Braised Chicken with Peppers and Tomatoes Recipe
Why You'll Love This Recipe
Honestly, this dish has become a staple in my kitchen because it’s so forgiving, flavorful, and straightforward. Once you get the hang of it, it feels like you’re indulging in something special without any drama.
- Deep Flavor Development: Searing the chicken and deglazing with white wine creates layers of taste you wouldn’t expect from such a simple recipe.
- Colorful, Vibrant Ingredients: The peppers and tomatoes not only taste amazing but brighten up your plate beautifully.
- Comfort in a One-Pan Dish: Easy to make and cleanup-friendly, it’s perfect for weeknight dinners or casual weekend meals.
- Flexible and Adaptable: You can easily tweak ingredients to fit what you have on hand or cater to your taste preferences.
Ingredients & Why They Work
The magic here lies in the harmony of the chicken’s richness with the bright acidity of tomatoes and the sweet crunch of bell peppers. Choosing fresh, vibrant produce and quality wine really makes a difference, so I always recommend shopping with care.

- Boneless Skinless Chicken Thighs: They stay juicy and tender even after longer cooking, unlike breasts which can dry out.
- Red and Green Bell Peppers: Adding both colors gives a nice sweetness and variety in flavor and texture.
- Garlic: Quick sautéing releases its aroma without burning it, which would turn bitter.
- Dry White Wine: It lifts the sauce and adds complexity, but make sure it’s something you enjoy drinking.
- Olive Oil: Separating the amount helps sear the chicken perfectly and soften veggies without overcrowding the pan.
- Salt & Pepper: Simple, but essential seasoning to enhance every element.
- Basil Leaves: Fresh basil at the end adds brightness and a fragrant finish that ties the whole dish together.
- Plum Tomatoes (canned): Drained and crushed to give a thick, flavorful sauce base that's hearty without being watery.
Make It Your Way
I like to keep this dish close to traditional with lots of fresh basil, but I’ve also played around with swapping out green peppers for poblano or adding a pinch of chili flakes if I want some heat. It’s your kitchen, your rules—so have fun personalizing it!
- Variation: On occasion, I’ve used bone-in chicken pieces instead of thighs for a more rustic feel. It takes a bit longer to cook, but the flavor is incredible.
- Dietary Mods: For a lower-fat version, trimming even more fat or using chicken breasts works, just watch the cooking time so it doesn’t dry out.
- Seasonal Changes: In late summer, fresh heirloom tomatoes replace canned ones brilliantly—but be sure to remove excess liquid beforehand.
Step-by-Step: How I Make Braised Chicken with Peppers and Tomatoes Recipe

Step 1: Prep and Season the Chicken
The first thing I do is pat my chicken thighs dry with paper towels—this is key! Moisture on the surface can stop them from browning properly. After that, I season generously with salt and pepper on both sides. Don’t be shy here; it builds flavor from the start.
Step 2: Sear the Chicken for a Golden Crust
I heat my largest stainless steel pan over medium heat and add a couple tablespoons of olive oil. When it’s hot but not smoking, I add the thighs in a single layer—no overcrowding! After about 5 minutes per side, the chicken should have this gorgeous, deep golden crust. This step takes some patience but trust me, it pays off with flavor.
Step 3: Sauté Garlic and Peppers
After setting the chicken aside, I add the remaining olive oil and sliced garlic to the same pan. Just 60 seconds of gentle sautéing softens the garlic aroma without burning it. Then I toss in the sliced bell peppers, stirring to coat them in that pan flavor.
Step 4: Build the Sauce with Wine and Tomatoes
Next, pour in the dry white wine. I use my wooden spoon to scrape those delicious browned bits off the pan bottom—this technique is crucial because it unlocks all the flavor concentrated in those stuck bits. Then in go the hand-crushed plum tomatoes. I bring the whole mix to a gentle simmer—the bubbling is the stage where the sauce starts melding into something amazing.
Step 5: Braise the Chicken
I nestle the chicken back into the pan, stirring lightly so everything starts to get acquainted. With a lid or foil perched partially on top, I let it cook on a simmer for 30 to 35 minutes, stirring now and then. This slow braise softens the peppers and infuses the chicken with that tomato-wine goodness.
Step 6: Finish and Taste
If there’s still lots of liquid when the chicken is tender, I’ll lift the pieces out and crank the heat to reduce the sauce until it’s thick enough to coat the chicken nicely. Then I return the thighs briefly to that sauce. Lastly, tearing fresh basil leaves over the dish before serving adds that signature fragrant pop that makes this recipe so special.
Top Tip
Over the years, I’ve learned a few little tricks that keep this dish consistent and delicious every time. These are the things I wish I knew the first time I made it to avoid common pitfalls—sharing because I want your cooking to be smooth sailing!
- Don’t Skip Drying the Chicken: Wet chicken won’t sear properly, so pat all moisture off before seasoning.
- Use a Good Quality Wine: It doesn’t have to be expensive, but skip super cheap bottles—your sauce will taste better with a decent, dry white wine.
- Don’t Overcrowd the Pan: Sear chicken in batches if needed to develop that crucial brown crust instead of steaming it.
- Adjust Simmer Carefully: Keep the heat low enough to gently braise but high enough to cook the chicken fully without drying the sauce.
How to Serve Braised Chicken with Peppers and Tomatoes Recipe

Garnishes
For me, fresh torn basil is non-negotiable—it brings brightness and aroma that beautifully contrast the rich sauce. Sometimes I toss a few shreds of Parmesan or a drizzle of good-quality extra virgin olive oil on top right before serving to add a silky finish.
Side Dishes
I love serving this braised chicken with some crusty Italian bread for sopping up all that luscious sauce. Alternatively, creamy polenta or buttery mashed potatoes work wonderfully, too. Steamed green beans or a simple arugula salad help lighten the meal if you want something green on the side.
Creative Ways to Present
Once, for a casual dinner party, I served the chicken plated over long ribbons of sautéed zucchini noodles and garnished with microgreens for a fresh, modern twist. It always impresses when you serve it family-style in a large rustic skillet right at the table—everyone loves piling their plates with the colorful mix!
Make Ahead and Storage
Storing Leftovers
I usually transfer leftovers to an airtight container and keep them in the fridge for up to three days. The flavors actually deepen overnight, making for some seriously tasty next-day meals.
Freezing
I’ve frozen this dish a few times when I made too much and it freezes beautifully. Just let it cool completely, then pack into freezer-safe containers. It keeps well for up to two months, so you can have a quick dinner waiting on a busy day.
Reheating
Reheating gently is key to keeping the chicken tender. I prefer warming it on the stovetop over low heat with a splash of water or broth to loosen the sauce. The microwave works too if you cover the dish and stir every 30 seconds.
Frequently Asked Questions:
You can definitely use chicken breasts for this Braised Chicken with Peppers and Tomatoes Recipe, but be mindful that breasts can dry out if overcooked. I recommend shortening the braising time and checking for an internal temperature of 165°F to keep them juicy.
Dry white wines such as Pinot Grigio, Sauvignon Blanc, or an unoaked Chardonnay work best here. Choose a wine you would enjoy drinking since the flavor concentrates in the sauce during cooking.
Absolutely! If using fresh tomatoes, I recommend peeling, seeding, and crushing them yourself. Be sure to drain any excess liquid so the sauce doesn’t become too watery.
For dark meat like chicken thighs, cooking to an internal temperature of 175°F allows the connective tissue to break down, yielding tender, juicy chicken. Use a meat thermometer to check for doneness during braising.
Final Thoughts
This Braised Chicken with Peppers and Tomatoes Recipe hits all the right notes for me: it’s comforting yet fresh, flavorful yet uncomplicated. Making it feels like a little act of self-care—and sharing it always brings smiles around the table. I hope you give it a whirl and find it as satisfying as I do. Trust me, once you make this, it’s going to become one of those dishes you reach for again and again.
Print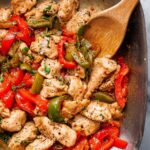
Braised Chicken with Peppers and Tomatoes Recipe
- Prep Time: 5 minutes
- Cook Time: 50 minutes
- Total Time: 55 minutes
- Yield: 6 servings
- Category: Main Course
- Method: Stovetop
- Cuisine: Italian
- Diet: Halal
Description
A flavorful Italian-inspired dish featuring tender boneless chicken thighs cooked with vibrant red and green bell peppers, garlic, plum tomatoes, and a splash of dry white wine. Finished with fresh basil for a rich, comforting meal perfect served with crusty Italian bread.
Ingredients
Chicken
- 4 pounds boneless skinless chicken thighs trimmed of any large pieces of fat
- salt and pepper to taste
- ¼ cup olive oil divided
Vegetables and Sauce
- 2 large red bell peppers sliced
- 2 large green bell peppers sliced
- 4 cloves garlic sliced
- ½ cup dry white wine
- 1 28-ounce can plum tomatoes hand crushed and drained
- ¼ cup packed basil leaves hand torn, for finishing
Instructions
- Drain Tomatoes: Drain one 28-ounce can of plum tomatoes in a colander, reserving the pulp for the recipe.
- Season Chicken: Pat the chicken thighs dry with paper towels then season liberally with salt and pepper on both sides.
- Sear Chicken: Heat a large stainless steel frypan or burner-safe roasting pan to medium heat. Add 2 tablespoons of olive oil and sear the chicken thighs for 5 minutes per side until well browned. Work in batches to avoid overcrowding.
- Sauté Garlic and Peppers: Set seared chicken aside tented with foil. Add remaining olive oil and sliced garlic to the pan and sauté for 60 seconds. Add sliced bell peppers and toss to coat.
- Deglaze and Build Sauce: Pour in ½ cup dry white wine and scrape the bottom of the pan with a wooden spoon to release browned bits. Add the plum tomatoes and bring the sauce to a simmer.
- Simmer Chicken in Sauce: Add the seared chicken thighs back into the pan and stir together with the sauce. Partially cover with a lid or foil and simmer for 30-35 minutes, stirring occasionally.
- Adjust Sauce Consistency: If the sauce remains too liquid after cooking, remove chicken to a plate and cook sauce over medium-high heat for 5-10 minutes to thicken, then return chicken.
- Season and Finish: Taste and adjust salt and pepper. Turn off the heat, tear fresh basil leaves and sprinkle over the chicken and peppers.
- Serve: Serve warm with crusty Italian bread to mop up the flavorful sauce. Enjoy!
Notes
- Any type of chicken can be used, but traditionally whole skin-on pieces are common.
- For white meat, avoid cooking past 165°F to prevent dryness; dark meat like thighs should reach 175°F for tenderness.
- Recommended dry white wines include Pinot Grigio, Sauvignon Blanc, or unoaked Chardonnay.
- Leftovers store well for up to 3 days and reheat well in microwave or stovetop on medium-low heat.
Nutrition
- Serving Size: 1 serving
- Calories: 450 kcal
- Sugar: 8 g
- Sodium: 350 mg
- Fat: 25 g
- Saturated Fat: 5 g
- Unsaturated Fat: 18 g
- Trans Fat: 0 g
- Carbohydrates: 15 g
- Fiber: 4 g
- Protein: 40 g
- Cholesterol: 120 mg


Leave a Reply