There’s something about the holiday season that calls for sweet treats with a festive twist, and the Candy Cane Kiss Cookies Recipe is exactly that kind of magic. These cookies blend the cool, refreshing zing of peppermint with a soft buttery base, topped with a gooey, melting Hershey’s Candy Cane Kiss that’s just irresistible.

Jump to:
Why You'll Love This Recipe
I remember the first time I made these cookies—the smell of peppermint filling the kitchen instantly transported me into holiday spirit mode. What makes the Candy Cane Kiss Cookies Recipe so special is how effortlessly it balances sweetness, minty freshness, and that classic chocolate kiss finish. It’s a guaranteed crowd-pleaser every single time!
- Minty and Chocolatey Combo: The peppermint extract and crushed candy canes blend perfectly with the Hershey’s Kisses for an unforgettable festive flavor.
- Simple Ingredients: No fancy or hard-to-find items here—just pantry staples and candy canes you can grab anywhere.
- Fun and Festive Look: That bright crushed candy cane coating and the colorful Kiss on top make these cookies a charming holiday gift or party staple.
- Easy to Make: The chilling step makes the dough manageable and prevents over-spreading, so each cookie turns out beautifully thick and soft.

Ingredients & Why They Work
All of these ingredients work together to build a cookie that’s soft but sturdy enough to hold the kisses on top. The peppermint elements bring in that iconic candy cane feel, while the butter and sugar create that melt-in-your-mouth texture. Here’s a quick rundown on what makes each ingredient essential and how to shop smart.
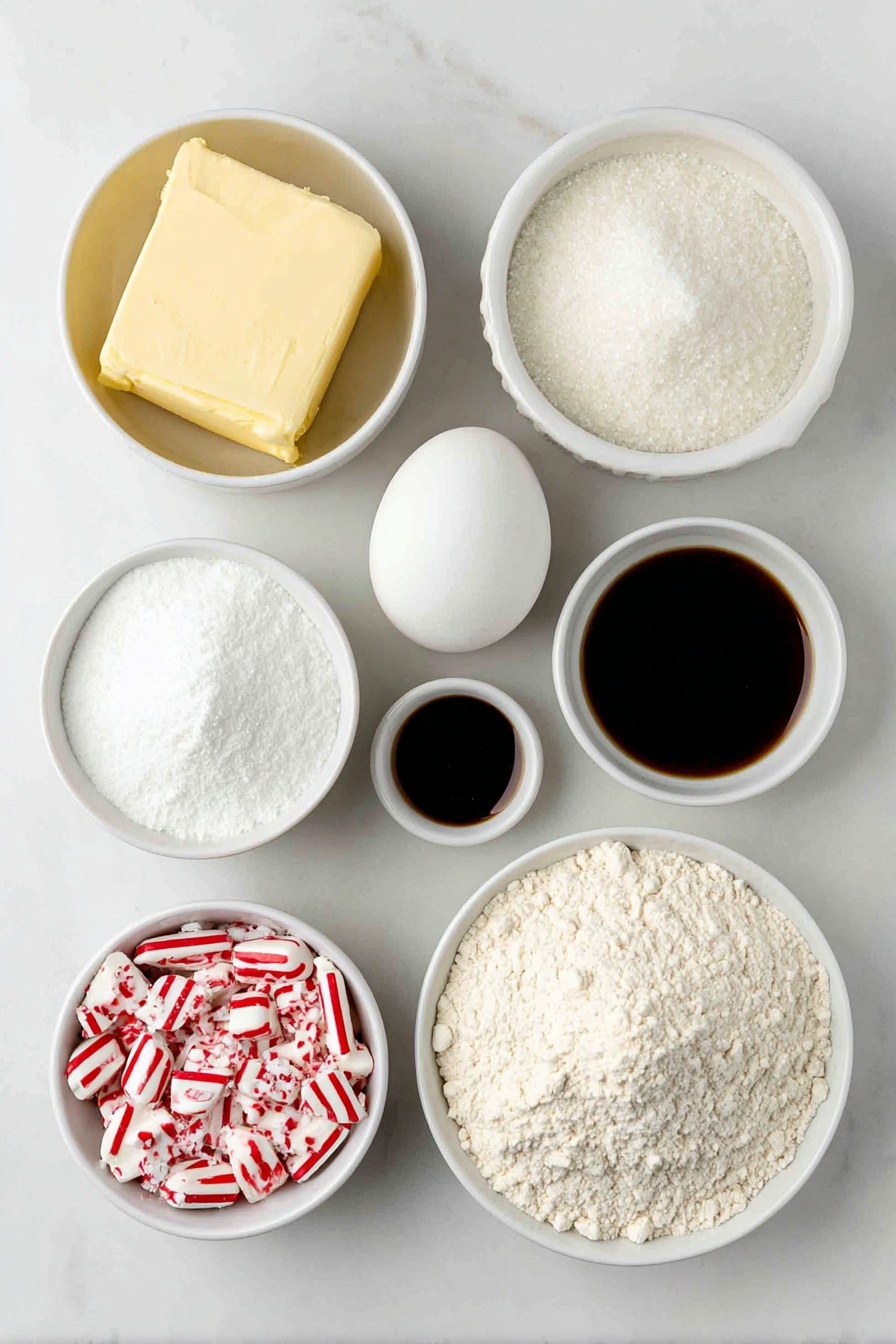
- Unsalted butter: Starting unsalted lets you control the saltiness perfectly—the fat in the butter keeps cookies tender and moist.
- White sugar: Divided use here helps with structure and sweetness, plus rolling the dough in sugar adds a subtle crust.
- Egg: The binder that holds everything together and adds richness.
- Vanilla extract: A background flavor that brings balance and depth.
- Peppermint extract: This is your main flavor punch—just the right amount is key to avoid overpowering the cookie.
- All-purpose flour: The backbone for your cookie dough, providing structure.
- Baking soda: Adds just a bit of lift so your cookies aren’t flat.
- Salt: Enhances all the sweet and minty flavors.
- Milk: Keeps the dough soft and moist without watering it down.
- Crushed candy canes: Gives texture and sparkle, plus tiny bursts of peppermint flavor in every bite.
- Hershey’s Candy Cane Kisses: The star of the show, melting perfectly on warm cookies for that signature “kiss” finish.
Make It Your Way
I love making this recipe exactly as is for that perfect seasonal taste, but I've also had fun tweaking it a bit. You should feel free to get creative and make it your own—these cookies are forgiving and adaptable!
- Variation: Once, I swapped crushed candy canes for mini chocolate chips on half the batch because some family members aren’t huge mint fans—still amazing and equally festive.
- Dietary tweak: Using a dairy-free butter substitute worked well for a lactose-intolerant friend, just remember it might affect texture slightly.
- Seasonal change: You can swap peppermint extract for almond extract around Valentine’s Day for a subtle twist that pairs beautifully with the chocolate.
- Difficulty level: If you’re in a hurry, you can skip the chill step, but expect thinner cookies that spread more—still tasty, just a bit different.
Step-by-Step: How I Make Candy Cane Kiss Cookies Recipe
Step 1: Set Up and Cream the Butter and Sugar
I generally line two baking sheets with parchment paper right away; it makes cleanup a breeze later! Then, I cream the softened butter with one cup of sugar using a handheld mixer on medium-low. This takes about 1-2 minutes until everything is fluffy and pale—trust me, this step sets you up for soft, chewy cookies.
Step 2: Add Egg and Extracts
Next, I mix in the egg, vanilla extract, and peppermint extract for about a minute. This is when the dough really starts smelling like the holidays!
Step 3: Combine Dry Ingredients
In a separate bowl, I whisk together the flour, baking soda, and salt. Mixing these dry ingredients before adding them helps avoid clumps and ensures an even distribution of leavening.
Step 4: Bring It All Together
I add the flour mixture, milk, and crushed candy canes to the butter mixture and beat just until combined—this only takes about 30 seconds. Overmixing can make your cookies tough, so I keep it brief to stay on the safe side.
Step 5: Shape and Chill the Dough
I scoop the dough into one tablespoon-sized balls, then roll each ball between my palms to smooth out the edges. Next, I roll the balls in the remaining quarter cup of sugar to coat them; this creates a delicate crunch on the outside once baked. The dough balls get spaced about 2 inches apart on the cookie sheets and refrigerated flat for two hours—this chilling step is key to preventing the cookies from spreading too much in the oven.
Step 6: Bake and Add the Kisses
While the dough chills, I preheat the oven to 375°F (190°C). I bake the cookies for exactly 10 minutes until the centers are set but still soft—not golden. After cooling for 5 minutes, I press an unwrapped Hershey’s Candy Cane Kiss into the center of each cookie while they’re still warm; the kiss slightly melts into the cookie, making that iconic peppermint-chocolate duo.
Top Tip
Over the years of making this recipe, I’ve learned some small tweaks that make a huge difference in the final cookie—these tips can help you get every batch just right, without stress.
- Chill the Dough: Don’t skip the 2-hour chill unless you're in a big rush; it helps the cookies keep their shape and not spread too thin.
- Roll Evenly: Rolling dough balls to the same size ensures even baking—using a cookie scoop is my secret weapon here.
- Add Kisses Promptly: Press the Kiss into the cookie right when they come out of the oven while still warm for that perfect melty finish.
- Use Fresh Peppermint Extract: Old or weak peppermint extract won’t give you that bright peppermint flavor, so always check the freshness for the best taste.
How to Serve Candy Cane Kiss Cookies Recipe

Garnishes
I usually keep garnishes simple because the cookies themselves are visually festive, but a dusting of powdered sugar or a sprig of fresh rosemary next to the plate adds a beautiful, seasonal touch without overpowering the peppermint flavor.
Side Dishes
These cookies are fantastic with a glass of cold milk or a steaming cup of hot cocoa topped with whipped cream. If you’re hosting a holiday gathering, they pair wonderfully with other seasonal favorites like gingerbread or spiced nuts for a festive cookie platter.
Creative Ways to Present
I once arranged these cookies on a rustic wooden board lined with evergreen branches for a cozy holiday party. Tying a small red ribbon around each cookie adds a charming gift-worthy vibe. Wrapping stacks in clear cellophane bags with a candy cane tucked inside makes for great neighbor gifts too.
Make Ahead and Storage
Storing Leftovers
After cooling completely, I store leftover cookies in an airtight container at room temperature. I’ve found they keep their soft texture and peppermint kick well for up to 5-7 days, which is perfect for enjoying throughout the week without them drying out.
Freezing
If I’m making a big holiday batch, I freeze the cookie dough balls before baking. I place them on a baking sheet to firm up, then transfer them to a freezer bag. When I’m ready, I bake from frozen, adding an extra minute or two to the baking time. This method keeps the cookies fresh and flavorful.
Reheating
To reheat, I pop the cookies in a 300°F oven for about 5 minutes—this revives that soft texture and slightly melts the kiss again just a little. Alternatively, a quick microwave zap (10-15 seconds) works if you’re in a hurry but be careful not to overdo it or the cookie will turn chewy and the chocolate might seize.
Frequently Asked Questions:
Absolutely! While the peppermint Kisses complement the candy cane flavor perfectly, regular Hershey’s Kisses give you a classic chocolate finish that’s delicious too.
Skipping the chill will cause the cookies to spread more during baking, resulting in thinner, crisper cookies rather than thick, soft ones. They’ll still taste good, but I recommend chilling for the best texture.
Yes! You can make the dough and chill it for up to 48 hours before baking, or freeze shaped dough balls for longer storage. Just bring frozen dough to room temperature or bake directly with a few extra minutes.
I usually place candy canes inside a sturdy plastic bag and gently tap them with a rolling pin or meat mallet on the counter. This keeps the pieces contained and gives you nice little bits without dust everywhere.
Final Thoughts
These Candy Cane Kiss Cookies Recipe have become a must-make holiday tradition for me and my family. There’s something truly heartwarming about sharing cookies that are as joyful to make as they are to eat. I hope you’ll give them a try and enjoy the festive cheer baked right into every bite—happy holidays and happy baking, friend!
Print
Candy Cane Kiss Cookies Recipe
- Prep Time: 10 minutes
- Cook Time: 10 minutes
- Total Time: 2 hours 15 minutes
- Yield: 28 cookies
- Category: Dessert
- Method: Baking
- Cuisine: American
- Diet: Vegetarian
Description
Candy Cane Kiss Cookies are festive peppermint-flavored cookies with a crisp sugar coating and a sweet Hershey's Candy Cane Kiss pressed into the center. These delightful treats are perfect for holiday celebrations and bring a refreshing minty twist to classic sugar cookies.
Ingredients
Dough Ingredients
- ½ cup unsalted butter softened
- 1¼ cup white sugar divided
- 1 large egg
- 1 teaspoon vanilla extract
- ½ teaspoon peppermint extract
- 2 cups all-purpose flour
- ¼ teaspoon baking soda
- ¼ teaspoon salt
- 2 teaspoon milk
- ½ cup crushed candy canes
Topping
- 28 Hershey’s Candy Cane Kisses
Instructions
- Prepare Baking Sheets: Line two baking sheets with parchment paper and set aside.
- Cream Butter and Sugar: Using a handheld mixer on medium-low speed, cream together the softened butter and 1 cup of sugar until fluffy, about 1-2 minutes.
- Add Wet Ingredients: Add the egg, vanilla extract, and peppermint extract to the creamed mixture and mix for another 1 minute until well combined.
- Mix Dry Ingredients: In a separate bowl, stir together the all-purpose flour, baking soda, and salt until evenly combined.
- Combine Dough: Add the flour mixture, milk, and crushed candy canes to the wet ingredients. Beat just until mixed, about 30 seconds, being careful not to overmix.
- Form Cookies: Scoop the dough into 1 tablespoon-sized portions and roll each into a smooth ball using your hands.
- Coat with Sugar: Roll each cookie dough ball in the remaining ¼ cup of sugar to coat the outside evenly.
- Chill Dough: Place the coated dough balls onto the prepared baking sheets about 2 inches apart. Refrigerate the cookie sheets flat for 2 hours to chill the dough before baking.
- Preheat Oven: While chilling, preheat your oven to 375 degrees Fahrenheit.
- Bake Cookies: Bake the chilled cookies for 10 minutes or until the centers are set but not browned.
- Add Candy Cane Kisses: Remove cookies from the oven and let cool for 5 minutes. Press one unwrapped Hershey’s Candy Cane Kiss into the center of each cookie while still warm.
Notes
- Store leftover cookies at room temperature in a sealed container for 5-7 days to maintain freshness.
- For extra peppermint flavor, add a few drops of peppermint extract to the frosting if decorating.
- Crushed candy canes can be substituted with peppermint chips if preferred.
- If dough is too soft to handle, add a little more flour, 1 tablespoon at a time, until manageable.
- Make sure to chill the dough thoroughly to prevent cookies from spreading too much while baking.
Nutrition
- Serving Size: 1 cookie
- Calories: 150 kcal
- Sugar: 12 g
- Sodium: 85 mg
- Fat: 7 g
- Saturated Fat: 4 g
- Unsaturated Fat: 3 g
- Trans Fat: 0 g
- Carbohydrates: 20 g
- Fiber: 0.5 g
- Protein: 1 g
- Cholesterol: 20 mg


Leave a Reply