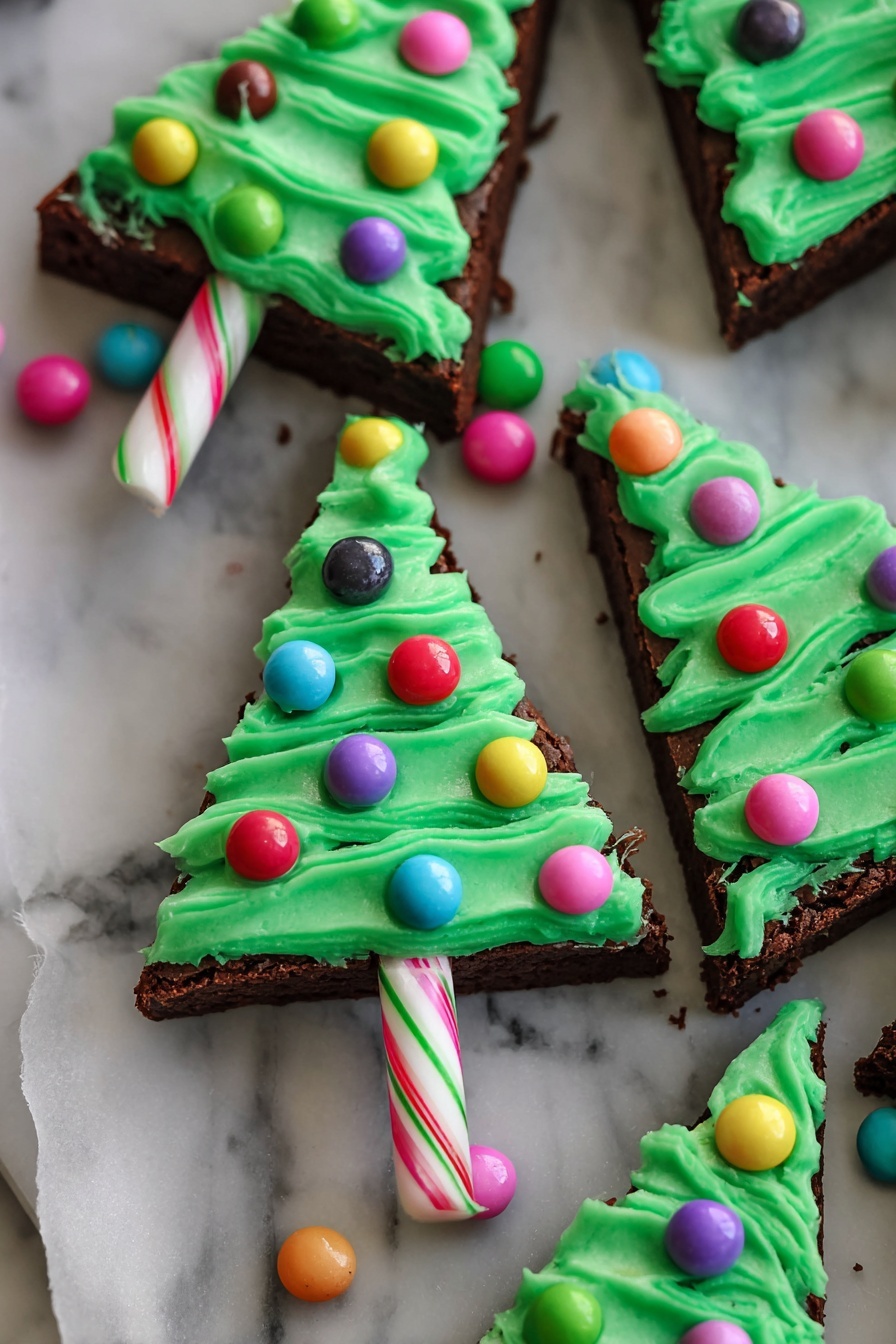
There’s something truly magical about festive treats that bring the holiday spirit right into your kitchen. This Christmas Tree Brownies Recipe is one of those delightful desserts that’s not only rich and fudgy but also joyfully festive to make and share with family and friends around the holidays.

Jump to:
Why You'll Love This Recipe
I absolutely adore this Christmas Tree Brownies Recipe because it combines a classic fudgy brownie base with a playful, festive presentation that kids and adults both love. It’s a showstopper on holiday dessert tables and surprisingly easy to make!
- Festive fun factor: These brownies transform into charming Christmas trees, making them perfect for holiday parties or gifting.
- Rich, fudgy texture: The combination of dark and milk chocolate chips ensures every bite is moist and bursting with chocolate.
- Easy-to-follow steps: Even if you’re new to baking, this recipe walks you through everything with easy instructions to guarantee success.
- Customizable decorations: You can make it your own by switching up the frosting colors or the candies you use to decorate each tree.
Ingredients & Why They Work
The magic behind these Christmas Tree Brownies lies in the quality of the ingredients and the balance between richness and sweetness. Each one brings something special to bake incredibly fudgy, tender brownies that hold up well for decorating.
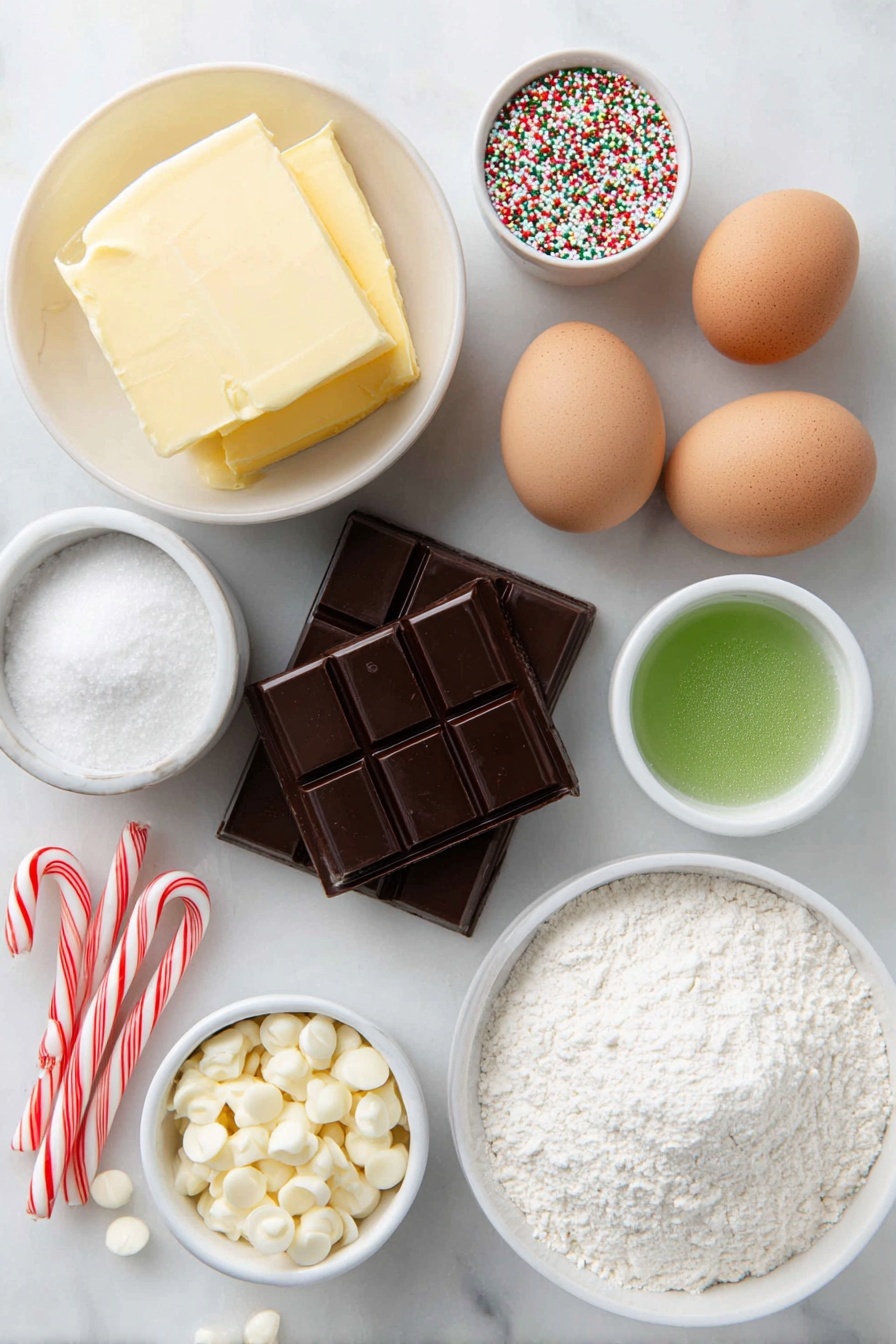
- Unsalted butter: Gives a creamy richness without adding saltiness, which lets the chocolate shine.
- Dark chocolate: Adds bitterness and deep cocoa flavor to balance the sweetness.
- Medium eggs: Provide structure and moisture to the batter.
- Caster sugar: Dissolves easily for a smooth texture and proper sweetness.
- Plain flour: The base that holds everything together without too much heaviness.
- Cocoa powder: Powers that chocolate flavor and adds an intense color.
- Milk chocolate chips: For pockets of melty, creamy sweet bites inside the brownies.
- White chocolate chips: Offers sweet contrast and a bit of textural variety.
- Candy canes: Used as “tree trunks” and adds a peppermint crunch.
- Unsalted butter (for icing): Creates a luscious base for the green buttercream icing.
- Icing sugar: Sweetens the frosting and thickens it for piping.
- Green food colouring: Gives your frosting that signature Christmas tree hue.
- Sprinkles & sweets: Bring color, sparkle, and fun decoration options to your brownies.
Make It Your Way
I love adding my personal spin when making these festive brownies, and you should totally do the same. This recipe is a fantastic base to experiment on, whether you want a richer chocolate hit or a different festive twist.
- Variation: One year, I swapped out candy canes for pretzel rods to give a salty crunch that pairs perfectly with the sweet brownies. I highly recommend trying it if you love sweet and salty flavors.
- Dairy-free option: Use a dairy-free butter substitute and dairy-free chocolate chips to make these brownies vegan-friendly. Just keep an eye on the chocolate melting step for best results.
- Nutty twist: Toss in chopped walnuts or pecans for extra texture—perfect if you enjoy a bit of crunch in your brownies.
Step-by-Step: How I Make Christmas Tree Brownies Recipe
Step 1: Melt the Chocolate and Butter
Start by gently melting the unsalted butter and dark chocolate together. I find doing this in a heatproof bowl over a pan of simmering water helps control the heat and prevents burning. Alternatively, a quick 1-2 minute burst in the microwave works too. Once smooth, let it cool to room temperature. Trust me, rushing this step can scramble your eggs later, so patience pays off!
Step 2: Whisk Eggs and Sugar
Now whisk your eggs and caster sugar together with an electric mixer until the mixture doubles in volume, becomes pale, and mousse-like in texture. Here’s a little insider tip: when you lift up the whisk, you want to see trails that fade away after a few seconds. This aeration is what gives your brownies that lovely lightness inside.
Step 3: Fold in the Chocolate Mixture
Pour in your cooled chocolate and butter blend and carefully fold it into your egg and sugar foam. Take your time here to keep as much air in the batter as possible—it may take a few gentle turns to combine but it’s worth it! Avoid aggressive mixing to keep your brownies nice and airy.
Step 4: Add Dry Ingredients and Chocolate Chips
Sift in the plain flour and cocoa powder and fold them in gently. Finally, stir through the milk and white chocolate chips. These add surprise bursts of melty creaminess throughout each square of brownie, which always feels like a little treat inside a treat.
Step 5: Bake and Cool
Pour the batter into your parchment-lined baking tray and bake at 180°C (160°C fan) for about 25-30 minutes. The key here is to watch for the edges being set and just a slight wobble in the center. Once out, let your brownies cool completely in the tray before cutting. Nothing ruins the shape like warm, gooey brownies!
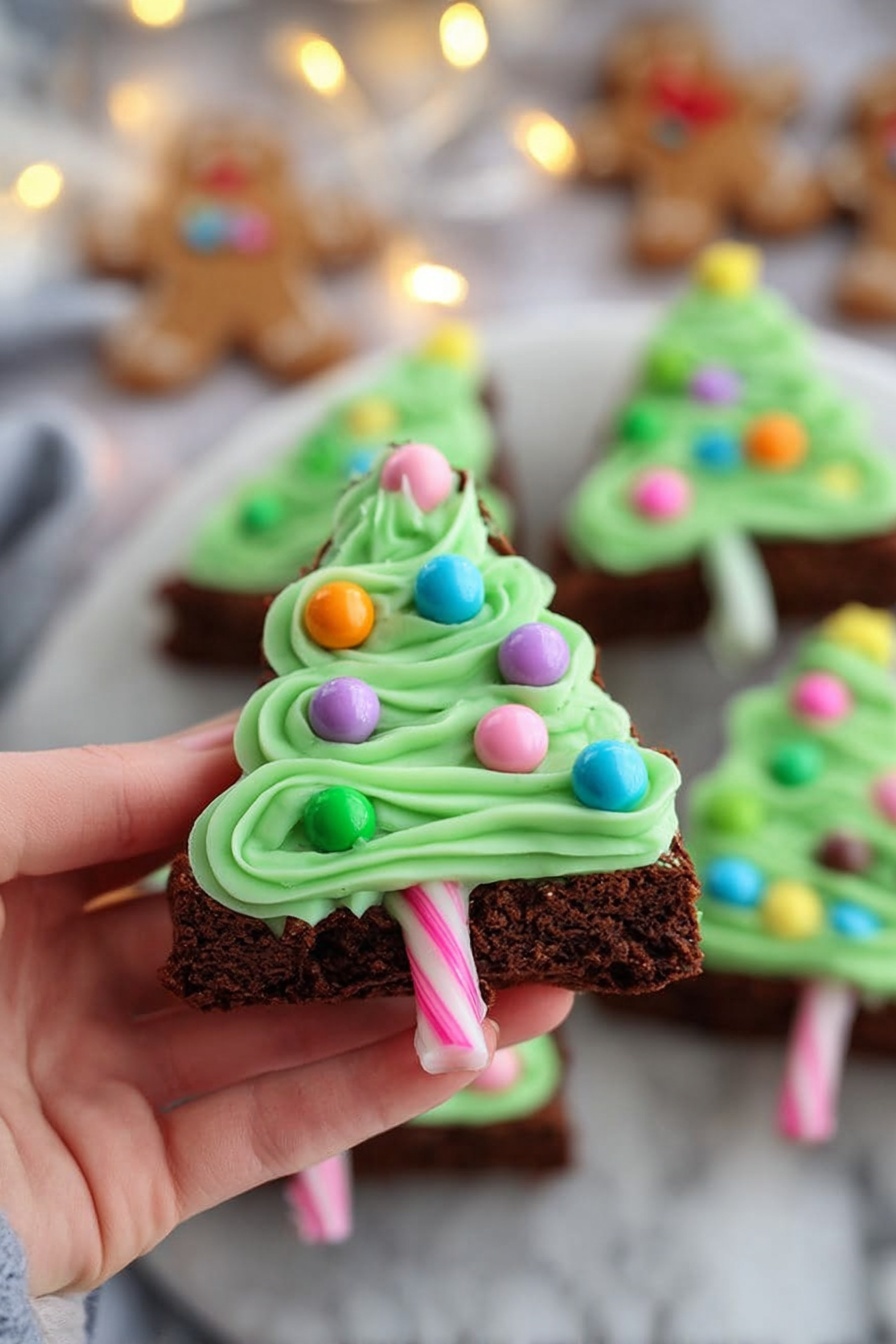
Step 6: Cut and Decorate
I cut mine by splitting the tray in half, then creating triangles from each half to mimic tree shapes. The offcuts? They made my taste testing rounds extra fun! Insert candy cane sticks gently into the base to create trunks. Then whip up a green buttercream with icing sugar, butter, and food coloring, pipe it on in zigzag lines, and decorate with sprinkles and a little star on top—an M&M works perfectly. So festive and cute!
Top Tip
After making these Christmas Tree Brownies a handful of times, I’ve learned a few tips that really make all the difference in the final treat.
- Whisking patience: Don’t rush the eggs and sugar step. You want that fluffy mousse texture to get the best rise and moisture in your brownies.
- Cooling time: Let your brownies cool completely before cutting and decorating — this helps maintain the shape and stop chocolate smudging during frosting.
- Gentle folding: Be kind when folding in flour and chocolate - overmixing can make the brownies dense. Keep it light and patient for that tender crumb.
- Decoration idea: Using a closed star piping tip helps mimick pine needles beautifully in the buttercream.
How to Serve Christmas Tree Brownies Recipe
Garnishes
I love using colorful Christmas-themed sprinkles, little candy baubles, and bright M&Ms to decorate. They add sparkle and personality, making each brownie look like its own tiny edible Christmas tree. Plus, kids adore helping with the decorating—it’s a fun holiday craft and dessert all in one.
Side Dishes
These brownies pair beautifully with a mug of hot cocoa or mulled wine, depending on your crowd. I also like serving them alongside a simple fruit salad or fresh whipped cream to lighten up the richness a little.
Creative Ways to Present
Try arranging several decorated brownies on a platter to form a big Christmas tree shape, or place them in individual clear treat bags tied with festive ribbons for charming holiday gifts. Last year, I made little brownie tree centerpieces for a party, and they were such a hit everyone wanted the recipe!
Make Ahead and Storage
Storing Leftovers
I keep leftover brownies in an airtight container at room temperature. They stay moist and delicious for up to one week—perfect for enjoying throughout the Christmas season or for last-minute treats.
Freezing
If I want to prep early, I freeze the baked and cooled brownies uncut, wrapped in clingfilm and foil. When I’m ready, I thaw them in the fridge overnight and cut them fresh to decorate. The taste and texture hold up surprisingly well after freezing!
Reheating
Leftover brownies are best enjoyed at room temp, but if you prefer warm, I pop a brownie in the microwave for 10 seconds—just enough to warm it through without melting the decorations. This little trick keeps it soft and enjoyable without losing the festive look.
Frequently Asked Questions:
Absolutely! You can substitute the plain flour for a gluten-free all-purpose blend. Just make sure the blend contains xanthan gum to help with texture. Baking times might be similar, but keep an eye on them as gluten-free batters sometimes cook a little faster or slower.
I recommend breaking off the curved tops of the candy canes and using just the straight parts. This way, they’re less fragile and easier to insert into the brownie base without cracking. Warm the candy canes slightly with your hands if they’re brittle to avoid snapping.
Use gel or paste food colouring rather than liquid—it gives a richer color without thinning your buttercream. Also, keep the decorated brownies refrigerated if not serving right away, but let them come to room temperature before eating for best flavor and texture.
Yes! Bake and cool the brownies completely, then store them undecorated in an airtight container for up to three days. Decorate just before serving to keep the buttercream fresh and vibrant. Alternatively, you can prepare the frosting ahead and keep it refrigerated until ready to pipe.
Final Thoughts
I love making this Christmas Tree Brownies Recipe every holiday because it combines my favorite thing—chocolate—with the joy of festive decorating. It’s easy enough to whip up after a busy day, fun for a family project, and always impresses guests. If you’re looking for a cheerful, delicious dessert that doubles as a festive centerpiece, give this recipe a try. I promise it’ll bring smiles and satisfy even the biggest brownie lovers!
Print
Christmas Tree Brownies Recipe
- Prep Time: 10 minutes
- Cook Time: 30 minutes
- Total Time: 40 minutes
- Yield: 10 brownies
- Category: Dessert
- Method: Baking
- Cuisine: British
Description
These festive Christmas Tree Brownies are rich and fudgy brownies shaped like Christmas trees, decorated with a vibrant green buttercream, candy cane trunks, and colorful sprinkles to bring holiday cheer to your dessert table. Perfect for gifting or a sweet treat during the festive season.
Ingredients
Brownies
- 200 g unsalted butter
- 200 g dark chocolate
- 4 medium eggs
- 275 g caster sugar
- 100 g plain flour
- 50 g cocoa powder
- 100 g milk chocolate chips
- 100 g white chocolate chips
Decorations
- 10 candy canes
- 100 g unsalted butter
- 200 g icing sugar
- Green food colouring
- Sprinkles
- Sweets (such as M&Ms for stars)
Instructions
- Prepare oven and tray: Preheat your oven to 180C/160C Fan and line a 9-inch square baking tray with parchment paper for easy removal of the brownies.
- Melt butter and chocolate: In a heatproof bowl over boiling water or in the microwave, melt together the 200 g unsalted butter and 200 g dark chocolate for 1-2 minutes until smooth. Set aside to cool to room temperature.
- Whisk eggs and sugar: Using an electric whisk or stand mixer, whisk 4 medium eggs and 275 g caster sugar together until pale, mousse-like, and doubled in volume. The batter should leave a trail when the whisk is lifted.
- Combine chocolate and egg mixture: Fold the cooled melted chocolate mixture gently into the egg and sugar mixture carefully to preserve the air whipped in.
- Add dry ingredients: Sift 50 g cocoa powder and 100 g plain flour over the chocolate mixture and fold in gently without knocking out air.
- Fold in chocolate chips and bake: Fold in 100 g milk chocolate chips and 100 g white chocolate chips until evenly distributed. Pour into the prepared tray and bake for 30 minutes until just set but fudgy.
- Cool and cut shapes: Allow the brownies to cool completely in the tray. Once cooled, cut the brownies in half, then cut each half into triangles to resemble Christmas trees. Eat any offcuts.
- Insert candy cane trunks: Carefully insert the straight parts of the candy canes into the base of each brownie triangle to form the tree trunks.
- Make green buttercream: Cream together 100 g unsalted butter and 200 g icing sugar to make buttercream. Add green food colouring until desired shade is reached.
- Pipe decorations: Transfer the green buttercream to a piping bag fitted with a 2D closed star tip and pipe zigzag lines on the brownie trees to resemble tree branches.
- Add final decorations: Decorate with sprinkles, sweets like M&Ms for stars atop the trees, and any other desired festive decorations. Serve and enjoy!
Notes
- Use regular candy canes and snap the curved tops off to just use the straight parts for tree trunks; leftover pieces work great in Christmas bark.
- Store the brownies in an airtight container up to one week and they make excellent Christmas gifts.
- This recipe is adapted from BBC Good Food with custom decoration ideas.
- Green food colouring, piping bags, and piping tips used are recommended for best results but can be substituted.
Nutrition
- Serving Size: 1 brownie
- Calories: 320 kcal
- Sugar: 30 g
- Sodium: 45 mg
- Fat: 20 g
- Saturated Fat: 12 g
- Unsaturated Fat: 7 g
- Trans Fat: 0 g
- Carbohydrates: 35 g
- Fiber: 3 g
- Protein: 4 g
- Cholesterol: 85 mg


Leave a Reply