There’s something truly magical about watching the colors of melted candy sparkle through delicate cookie cutouts — that’s exactly why this Stained Glass Cookie Recipe is a holiday favorite of mine. These cookies not only taste buttery and sweet but look like little works of art on your plate.

Jump to:
Why You'll Love This Recipe
Seriously, these stained glass cookies are not just beautiful—they’re a joy to make and even more fun to share. I still remember the first time I made them with my kids; those colorful windows mesmerized us all, and the buttery cookie base just melts in your mouth.
- Eye-Catching Treat: The translucent candy centers catch light beautifully, making every cookie feel like a mini stained glass masterpiece.
- Simple Ingredient List: Pantry staples combine with crushed hard candies for a surprisingly impressive effect without fuss.
- Family Fun Activity: Cutting out shapes and filling windows is a great way to get kids in on baking.
- Perfect for Gifting: They make thoughtful, homemade holiday gifts that everyone appreciates.

Ingredients & Why They Work
This recipe shines because of its simple, quality ingredients that come together to create the perfect cookie texture and those colorful, glassy centers. Let me walk you through the key players and what to look for when assembling your shopping list.

- Unsalted Butter: Softened, it provides rich flavor and tender crumb texture without overwhelming saltiness.
- Granulated Sugar: Gives the dough a sweet base and helps cookies brown slightly for that lovely golden edge.
- Eggs: Bind the dough together and contribute to the chewy but soft consistency I love.
- Vanilla Extract: Adds warmth and depth—don’t skip this or the cookies will taste flat.
- Salt: Balances sweetness and enhances flavor complexity.
- All-Purpose Flour: The hero for structure; too much flour and your cookies get tough, but just right keeps them tender.
- Coarse Sparkling Sugar: Used to sprinkle on top, it adds a delightful crunch and visual sparkle.
- Crushed Hard Candies (like Jolly Ranchers or Lifesavers): These melt into those signature stained glass centers—make sure not to crush too finely or you risk overcaramelizing.
Make It Your Way
I’m all about making this recipe your own. While the star cutouts are classic, I love switching things up with seasonal shapes and experimenting with candy colors depending on the occasion. You can totally tailor it—and I guarantee the results will delight.
- Variation: One year, I made heart-shaped stained glass cookies with red and pink crushed candies for Valentine’s Day. It was a hit, especially with the kids who loved picking their favorite colors.
- Dietary Twist: For a dairy-free version, swap butter with a firm coconut oil, but be mindful it will change the flavor and texture slightly.
- Seasonal Changes: Try pumpkin or candy corn candies for fall-themed stained glass windows—so fun and festive.
Step-by-Step: How I Make Stained Glass Cookie Recipe
Step 1: Cream Butter and Sugar Until Light
Start by beating the softened butter and granulated sugar together in your mixer for about two minutes. I find this step crucial—it really makes the dough light and fluffy before everything else joins the party. Don’t skip it!
Step 2: Add Eggs, Vanilla, and Salt
Next, add your eggs one at a time, mixing well after each addition so the dough stays smooth. Then, add in the vanilla and salt for flavor. Trust me, that little pinch of salt wakes up the whole dough!
Step 3: Fold in the Flour
Slowly add the flour to the wet mixture. I like to do this on low speed or mix by hand to avoid overworking the dough, which can make cookies tough. Once combined, shape the dough into a disc, wrap it up well, and chill it for at least an hour—or up to a whole day if you want to prep ahead.
Step 4: Roll, Cut, and Create Your Stained Glass Windows
Preheat your oven to 350°F, and line a baking sheet with parchment or a silicone mat. Divide your dough in half and only roll out one half at a time—this keeps the other half chilled and easier to handle. Roll the dough to about half an inch thick.
Cut out large star shapes with a 4-inch cookie cutter, then use a smaller 2-inch star cutter to hollow out the centers for candy filling. Don’t forget to save and re-roll scraps to maximize your yield!
Step 5: Sparkle and Chill Before Candy Fill
Gently press sparkling sugar onto the tops of your cookies—this adds a delightful crunch and shimmer. Then chill the cookies on the baking sheet in the fridge for 20 minutes. This step helps the cookies hold their shape and ensures that candy windows don’t run when baking.
Step 6: Fill Windows with Crushed Candy and Bake
Remove cookies from the fridge and carefully fill the centers about two-thirds full with coarse crushed hard candies. I like to use a toothpick to nudge the candy into the cookie points so it melts evenly without spilling over.
Bake for 10-12 minutes until the cookie edges are lightly golden and the candy centers look glossy and melted. Let them cool completely on the baking sheet—resisting the urge to move them before fully set is important to avoid cracking.
Step 7: Repeat and Enjoy!
Repeat the process with your remaining dough halves and any scraps. The best part? These cookies are just as fun to share as they are to make, and the colorful shine always impresses guests.
Top Tip
From my years of making this stained glass cookie recipe, a few tips have really helped me nail perfect cookies that look stunning and taste amazing every time.
- Coarse Candy Crush: Crush candies into small pebbles—not a powder—to avoid candy burning or running out of the cookie during baking.
- Chill Dough Twice: Chilling before and after shaping helps prevent spreading and keeps your window shapes crisp.
- Use a Toothpick: This small tool is magic for pushing candy into every nook without cracking the dough.
- Cool Completely Before Moving: The melted candy sets as it cools, so be patient to avoid cracking that beautiful “glass.”
How to Serve Stained Glass Cookie Recipe

Garnishes
I usually keep it simple by dusting powdered sugar lightly over the cookies before serving, which mimics the glow of frosted windows on a cold winter day. Sometimes, I add a sprig of rosemary or holly nearby for a festive look.
Side Dishes
These cookies pair wonderfully with a hot cup of spiced tea or rich hot cocoa. For brunch or dessert platters, I like to serve them alongside simple butter cookies or fresh fruit to balance the sweetness.
Creative Ways to Present
One of my favorite ways to present these cookies is in a clear glass jar or wrapped in cellophane tied with colorful ribbons that match the candy colors inside. They make fantastic party favors or gifts, and who doesn’t love a little edible art?
Make Ahead and Storage
Storing Leftovers
I store leftover cookies in a single layer inside an airtight container at room temperature. They stay fresh and retain their delicate texture for up to two days—after that, they start to soften too much because of the candy centers.
Freezing
Freezing baked stained glass cookies is tricky because the candy centers don’t freeze well—they can become grainy or crack. Instead, I recommend freezing unbaked dough discs wrapped tightly in plastic wrap, then thawing and baking fresh when you’re ready.
Reheating
Since these cookies are best enjoyed at room temperature, I don’t usually reheat them. If you want to warm them up slightly, a few seconds in the microwave can soften the cookie but might make the candy centers sticky, so keep it brief.
Frequently Asked Questions:
Absolutely! Any cookie cutter with a hollow center or outline will work great. Hearts, snowflakes, or Christmas trees add festive variety.
Hard candies like Jolly Ranchers or Lifesavers are best because they melt evenly and create that glassy look. Avoid chocolate or soft candies that won’t harden into stained glass windows.
Fill the window about two-thirds full and gently press candy pieces into the corners with a toothpick. Chilling the cookies before filling and after sprinkling sugar helps the dough keep its shape during baking.
Yes! The dough can be wrapped and refrigerated for up to one day before baking. This actually makes rolling and cutting easier and improves the cookie’s texture.
Final Thoughts
I truly believe this Stained Glass Cookie Recipe is one of those charming baking projects that brings warmth and joy to any kitchen, especially when shared with loved ones. They’re beautiful, delicious, and so satisfying to create. Give these a try for your next celebration—you’ll feel like an artist and a baker all at once, and your guests will be begging for the recipe!
Print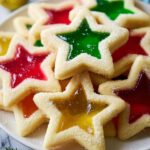
Stained Glass Cookie Recipe
- Prep Time: 40 minutes
- Cook Time: 12 minutes
- Total Time: 1 hour 52 minutes
- Yield: 20 servings
- Category: Dessert
- Method: Baking
- Cuisine: American
Description
Stained Glass Cookies are delightful buttery treats with a window of melted colorful candy that shines like stained glass. These festive cookies are perfect for holiday celebrations or any special occasion, combining a classic sugar cookie base with vibrant crushed hard candies.
Ingredients
Cookie Dough
- 1 cup unsalted butter softened
- 1 cup granulated sugar
- 2 eggs
- 1 ¼ teaspoon vanilla extract
- ½ teaspoon salt
- 3 cups all purpose flour
Topping and Filling
- ⅔ cup coarse sparkling sugar
- ½ cup crushed hard candies (Jolly Ranchers or Lifesavers work great)
Instructions
- Make the dough: In the bowl of a mixer, beat the butter and sugar until smooth, about 2 minutes. Add the eggs one at a time, beating well after each addition. Add the vanilla and salt, then slowly mix in the flour until thoroughly combined.
- Chill the dough: Remove the dough from the bowl and place it on a large piece of plastic wrap. Shape it into a disc, wrap tightly, and chill for at least 1 hour or up to 1 day.
- Preheat oven and prepare pans: Preheat the oven to 350 degrees Fahrenheit. Line a sheet pan with parchment paper or a nonstick baking mat.
- Roll and cut cookies: Divide the dough in half. Re-wrap one half and chill in fridge. Roll the other half into a ½ inch thick rectangle. Using a 4 inch star-shaped cookie cutter, cut out star shapes and place 1 inch apart on the baking sheet. Use a 2 inch star cutter to cut out the centers to create windows. Re-roll dough scraps and repeat.
- Add sugar topping and chill: Gently press coarse sparkling sugar into the tops of the cookies. Place the cookie sheet in the fridge and chill for 20 minutes.
- Fill with crushed candy: Remove cookies from fridge and fill each window ⅔ full with crushed candy, using a toothpick to poke candy into crevices carefully.
- Bake the cookies: Bake in the preheated oven for 12 minutes or until the cookies are light golden brown and the candy has melted to a stained glass effect. Cool completely on the baking sheet.
- Repeat: Repeat the rolling, cutting, chilling, filling, and baking steps with the remaining half of the dough.
- Store: Once cooled, store the cookies covered in a single layer for up to 2 days.
Notes
- Separate candies by color before crushing to keep vibrant color blocks.
- Crush candy to a consistency similar to coarse sand or small pebbles—not too fine or too chunky.
- Fill the cookie windows only about ⅔ full with candy to avoid overflow while baking.
- Use a toothpick to carefully nudge candy into all points of the cutout shapes for best coverage.
- Chilling dough and cookies before baking helps maintain shape and prevents spreading.
Nutrition
- Serving Size: 1 cookie
- Calories: 150 kcal
- Sugar: 14 g
- Sodium: 80 mg
- Fat: 8 g
- Saturated Fat: 5 g
- Unsaturated Fat: 3 g
- Trans Fat: 0 g
- Carbohydrates: 18 g
- Fiber: 0 g
- Protein: 2 g
- Cholesterol: 30 mg


Leave a Reply