There’s something magical about biting into light, airy cookies that melt on your tongue with a refreshing peppermint twist. This Festive Peppermint Meringue Cookies Recipe is wonderfully simple yet irresistibly charming, perfect for holiday gatherings or cozy afternoons by the fire.

Jump to:
- Why You'll Love This Recipe
- Ingredients & Why They Work
- Make It Your Way
- Step-by-Step: How I Make Festive Peppermint Meringue Cookies Recipe
- Top Tip
- How to Serve Festive Peppermint Meringue Cookies Recipe
- Make Ahead and Storage
- Frequently Asked Questions:
- Final Thoughts
- Festive Peppermint Meringue Cookies Recipe
Why You'll Love This Recipe
I adore this Festive Peppermint Meringue Cookies Recipe because it feels so festive and looks absolutely delightful with those candy cane colors. Plus, they’re light as air – wonderfully different from your typical holiday cookie.
- Easy to Make: Only a handful of simple ingredients come together quickly, and the process is straightforward once you know the tricks.
- Beautiful Presentation: The piped stars with red and green swirls make these cookies extra eye-catching for any holiday spread.
- Delightful Texture: Crisp on the outside and melt-in-your-mouth soft inside — meringues have a wonderfully unique texture.
- Versatile and Customizable: You can easily tweak the peppermint level or colors to match your style or occasion.

Ingredients & Why They Work
Each ingredient in this Festive Peppermint Meringue Cookies Recipe plays a key role in crafting that perfect balance of structure and sweetness. Using room temperature egg whites, for example, helps create more volume in your meringue, while the vinegar stabilizes the mixture for a better peak.

- Egg Whites: Room temperature egg whites whip up better and hold air well for fluffy meringues.
- White Vinegar: Adds acidity to stabilize the egg whites so they hold stiff peaks.
- Cornstarch: Helps absorb moisture so cookies stay crisp without becoming chewy.
- Caster Sugar: Finely granulated sugar that dissolves quickly to keep the texture smooth and not grainy.
- Peppermint Extract: Provides that signature festive flavor—be careful not to overdo it as it can be potent.
- Gel Food Coloring: Ideal for vibrant red and green colors without thinning the meringue.
Make It Your Way
What I love most about this Festive Peppermint Meringue Cookies Recipe is how easy it is to tweak. Sometimes I like dialing up the peppermint just a touch for an extra zing, or swapping out the red and green for pastel shades if it’s a different celebration.
- Variation: One year, I added mini chocolate chips right before baking for a delightful surprise—totally delicious if you want a chocolate twist.
Step-by-Step: How I Make Festive Peppermint Meringue Cookies Recipe
Step 1: Whip Your Whites Until Foamy Magic
Start by beating those room temperature egg whites on high speed. You want a foamy consistency, which usually takes around 30 seconds. This stage is crucial—it tells you the whites are waking up and ready to be transformed.
Step 2: Stabilize and Build Soft Peaks
Slowly add the white vinegar and cornstarch, then continue beating until you get soft peaks that slightly hold their shape. This takes about a minute. The vinegar helps keep the structure strong, so your meringues don’t collapse.
Step 3: Sweeten and Flavor
Now for the sugar! Add it slowly in a steady stream while beating continuously. This part can’t be rushed, or your meringue might not fluff up properly. Mix in the peppermint extract last, folding gently so you don't knock out the air.
Step 4: Color and Pipe With Love
Here’s a fun trick—use a pastry bag with a star tip and brush the inside with red gel food coloring before filling it halfway with meringue. Pipe small star-shaped cookies onto parchment paper. Repeat with green food coloring and the rest of the mix. The color lines swirl inside for a festive look!
Step 5: Bake Low and Slow
Bake at 200°F (93°C) for about 80 minutes, then turn the oven off and leave the cookies in there for another 4 hours or overnight. This slow drying is what keeps them crisp without browning. I always double-check my oven temp because too hot can ruin the meringues.
Top Tip
From my experience making this Festive Peppermint Meringue Cookies Recipe over the years, the biggest game-changer is patience—especially with beating and baking times. The right texture only comes from taking your time and following these little tips:
- Egg White Separation: Always separate eggs when cold and then let whites reach room temp before whisking to maximize volume.
- Slow Sugar Addition: Wait until the whites are foamy before adding sugar gradually to avoid deflating your mixture.
- Low Oven Temperature: Keep your oven steady around 200°F and use an oven thermometer if needed — this helps cookies dry perfectly instead of browning.
- Overnight Drying: Don’t rush taking cookies out when the oven turns off; letting them dry overnight results in ideal crispness.
How to Serve Festive Peppermint Meringue Cookies Recipe

Garnishes
I like to keep it simple with these cookies, serving them alongside a dusting of powdered sugar and crushed candy canes for an extra peppermint punch and crunch. The crushed peppermint adds a lovely texture contrast that complements the delicate cookies perfectly.
Side Dishes
Pair these with a warm cup of hot cocoa or a peppermint mocha to echo the flavors. They also work beautifully with a simple bowl of vanilla ice cream or alongside a plate of rich chocolate truffles for a festive dessert board.
Creative Ways to Present
One holiday season, I arranged them in layers between clear glass plates to make a fun upside-down Christmas tree display, topping it with a star-shaped cookie on top. Wrapping them in cellophane tied with red and green ribbons also makes them gorgeous gifts for friends and family.
Make Ahead and Storage
Storing Leftovers
I store leftover meringue cookies in an airtight container at room temperature. They keep well for up to a week but are best enjoyed within 2-3 days when their crispness is at its peak.
Freezing
These freeze really well! Pop them in an airtight container or freezer bag and thaw them on the counter for about 15 minutes. Just make sure they’re completely dry before freezing to avoid sogginess.
Reheating
If you want to freshen them up a bit, place the cookies on a baking sheet and warm in a low oven (around 200°F) for 5–10 minutes. This helps bring back some crispness without melting or browning them.
Frequently Asked Questions:
Powdered sugar is not recommended for this Festive Peppermint Meringue Cookies Recipe because its fine texture and added cornstarch can affect the meringue's ability to whip properly. If you don’t have caster sugar, pulse granulated sugar in a food processor until fine to create a suitable substitute.
Sticky meringues usually mean the cookies haven’t dried out enough. Make sure to bake at a low temperature and let them cool and dry in the turned-off oven for the recommended time. Also, high humidity can cause stickiness, so try to make them on drier days if possible.
Absolutely! While peppermint gives these meringues their festive character, you can swap it for vanilla, almond, or lemon extract to suit different tastes or occasions. Just reduce the amount slightly if the flavor is stronger.
You’ll know the egg whites have reached stiff peaks when you lift the whisk and the peaks stand straight up without drooping. The mixture should be glossy and hold its shape well. Avoid over-beating as it can cause dryness and cracking during baking.
Final Thoughts
Sharing this Festive Peppermint Meringue Cookies Recipe with you is like sharing a little holiday joy from my kitchen to yours. These cookies bring a special lightness to the season – both in taste and spirit. I promise, once you try them, they’ll become a beloved staple for your festive celebrations, just like they are in my family.
Print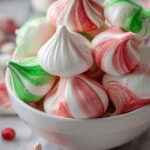
Festive Peppermint Meringue Cookies Recipe
- Prep Time: 15 minutes
- Cook Time: 1 hour 20 minutes
- Total Time: 5 hours 35 minutes
- Yield: 60 cookies
- Category: Dessert
- Method: Baking
- Cuisine: American
- Diet: Vegetarian
Description
These Christmas Meringue Cookies are light, airy, and perfectly sweet with a refreshing peppermint flavor. Featuring festive red and green colors, they are ideal for holiday celebrations and can be piped into charming star shapes. Baked slowly at a low temperature to achieve a dry, crisp texture, these cookies are a delightful, melt-in-your-mouth treat perfect for sharing.
Ingredients
Meringue Base
- 4 egg whites room temperature
- 1 tablespoon white vinegar
- 1 tablespoon cornstarch
- 1 cup caster sugar
- ¾ teaspoon peppermint extract
- gel food coloring (red and green)
Instructions
- Beat Egg Whites: Beat the egg whites on high speed until foamy, which should take about 30 seconds.
- Add Stabilizers: Incorporate the white vinegar and cornstarch, then continue beating until soft peaks form, about one minute.
- Incorporate Sugar: Slowly add caster sugar in a steady stream while beating. Then add peppermint extract and beat for about 4 minutes until stiff peaks form.
- Prepare Piping Bag: Using a pastry bag fitted with a star tip, draw lines on the inside of the bag with red gel food coloring. Fill the bag halfway with the meringue mixture.
- Pipe Cookies: Pipe one-inch star-shaped cookies onto a parchment-lined baking sheet. Repeat the process with the other half of the meringue mixture, using green gel food coloring in the piping bag.
- Bake: Place the baking sheets in a 200 degree oven and bake for about 80 minutes.
- Dry: After baking, turn off the oven and leave the cookies inside for an additional 4 hours or overnight to dry thoroughly.
- Store: Once cooled, store the cookies in an airtight container for up to one week.
Notes
- Don’t add the sugar too soon; wait until the egg whites look foamy before adding it to ensure the meringue becomes fluffy.
- Carefully separate the yolks from the whites to prevent any yolk contamination, which can prevent stiff peaks.
- Check your oven temperature accurately; a lower, steady temperature dries the cookies without browning or losing their light texture.
- Meringue cookies are best eaten within a few hours after baking, though they can be stored for up to a week.
- Caster sugar has no exact substitute, but you can make your own by pulsing granulated sugar in a food processor until fine. Do not substitute powdered sugar.
Nutrition
- Serving Size: 1 cookie
- Calories: 15 kcal
- Sugar: 3 g
- Sodium: 5 mg
- Fat: 0 g
- Saturated Fat: 0 g
- Unsaturated Fat: 0 g
- Trans Fat: 0 g
- Carbohydrates: 4 g
- Fiber: 0 g
- Protein: 0.3 g
- Cholesterol: 0 mg


Leave a Reply