There’s nothing quite like the crisp, refreshing bite of a homemade peppermint treat to bring that holiday magic alive. This Festive Peppermint Patties Recipe is one I return to year after year, especially when I want something charmingly colorful and delightfully minty on the dessert table.

Jump to:
Why You'll Love This Recipe
This Festive Peppermint Patties Recipe isn’t just about taste — it’s a whole experience. When I make these, I love how simple ingredients come together into a chewy, fresh treat that looks as fun as it tastes. Plus, customizing colors makes it feel like a little holiday craft session!
- Vibrant holiday colors: You get beautiful red, green, and classic white patties that brighten up any candy dish.
- Minty fresh flavor: The peppermint extract gives that perfect cooling zing that screams Christmas spirit.
- Easy to make at home: It’s straightforward, no fancy equipment needed, just some mixing and shaping.
- Perfect for gifting or parties: These candies make charming handmade gifts or festive party favors your friends will adore.

Ingredients & Why They Work
Each ingredient here has a clear role — creaminess, sweetness, flavor, or texture — and together they create this soft, melt-in-your-mouth peppermint patty dough. I always suggest picking good quality peppermint extract and fresh cream cheese to get the best flavor and texture.
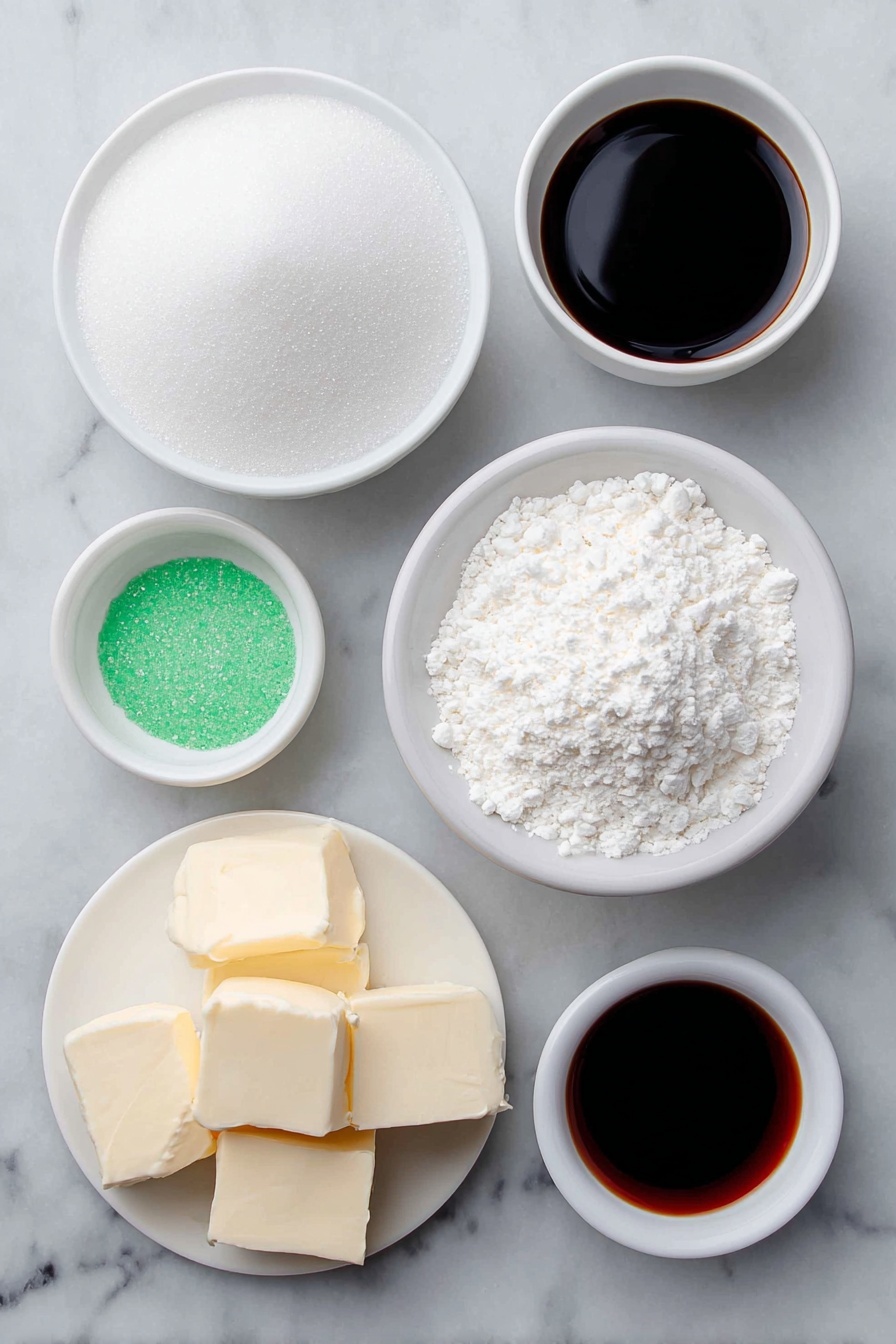
- Granulated sugar: Used for coating the finished patties, giving a slight crunch and classic sugar sparkle.
- Cream cheese: Brings smoothness and a subtle tang that balances the sweetness beautifully.
- Unsalted butter: Adds richness without overpowering the peppermint flavor.
- Light/clear corn syrup: Helps bind the mixture while adding a slight chew to the texture.
- Peppermint extract: The star flavor — make sure it’s pure and strong for that iconic minty punch.
- Powdered sugar: The bulk of the sweetener and structure; it keeps the dough soft but firm enough to shape.
- Green and red liquid food coloring: To make those festive colors pop — a little goes a long way!
Make It Your Way
I love playing with the colors — sometimes adding a deeper red for a candy cane vibe or swirling the green and white dough together for a marbled look. You can easily adapt this to suit your style or seasonal themes!
- Variation: One year, I swapped out red and green for blues and silvers when I threw a winter wonderland party — the icy colors were stunning and just as tasty!
Step-by-Step: How I Make Festive Peppermint Patties Recipe
Step 1: Cream It All Together
Start by beating together the cream cheese, butter, corn syrup, and peppermint extract until everything is smooth and creamy. I use a handheld mixer on low speed for just about a minute — don’t rush it! This step ensures your dough has a silky base for the powdered sugar.
Step 2: Mixing in the Powdered Sugar
Add the powdered sugar gradually, about half a cup at a time, mixing on low. The dough will thicken, so be ready to switch to a spatula or your hands once it’s too stiff for the mixer. This slow mixing is key — it prevents the dough from becoming gritty or too dry.
Step 3: Color and Knead the Dough
Divide the dough into three equal parts. You’ll color two balls — one red, one green — leaving one white. When kneading your colored dough, add a touch more powdered sugar if it feels sticky from the liquid food color. This part takes a bit of muscle, but it’s fun seeing the colors glow under your palms!
Step 4: Shape, Slice, and Roll
Roll each colored dough ball into an 18-inch rope, about an inch thick. Slice the ropes into half-inch pieces, then roll each piece into a neat ball. This tactile part is the most satisfying — it’s like shaping little bites of holiday cheer.
Step 5: Sugar Coat and Flatten
Toss a few peppermint balls at a time in granulated sugar to coat, then place them on a lined baking tray. Use the fork to gently press each ball into a small disc, creating pretty striped patterns on top — it’s those details that make them feel extra special.
Step 6: Set and Enjoy
Let the patties rest at room temperature for up to 24 hours before serving. This drying step helps them firm up just right for that perfect peppermint patty texture.
Top Tip
I’ve made these festive peppermint patties dozens of times, and the key to perfect texture and color is patience — especially when adding powdered sugar while kneading. Don’t rush adding it; little by little is best. Here’s what I’ve learned along the way:
- Gradual Powdered Sugar Addition: Slowly sprinkle powdered sugar to avoid a crumbly dough — you want just the right softness.
- Knead Thoroughly: Kneading ensures colors distribute evenly and helps the texture become smooth and pliable.
- Use Liquid Food Coloring Sparingly: A few drops go a long way — adding too much makes the dough sticky and harder to handle.
- Patience Is Key: Allow the patties to set at room temperature; skipping this can leave them too soft and sticky.
How to Serve Festive Peppermint Patties Recipe
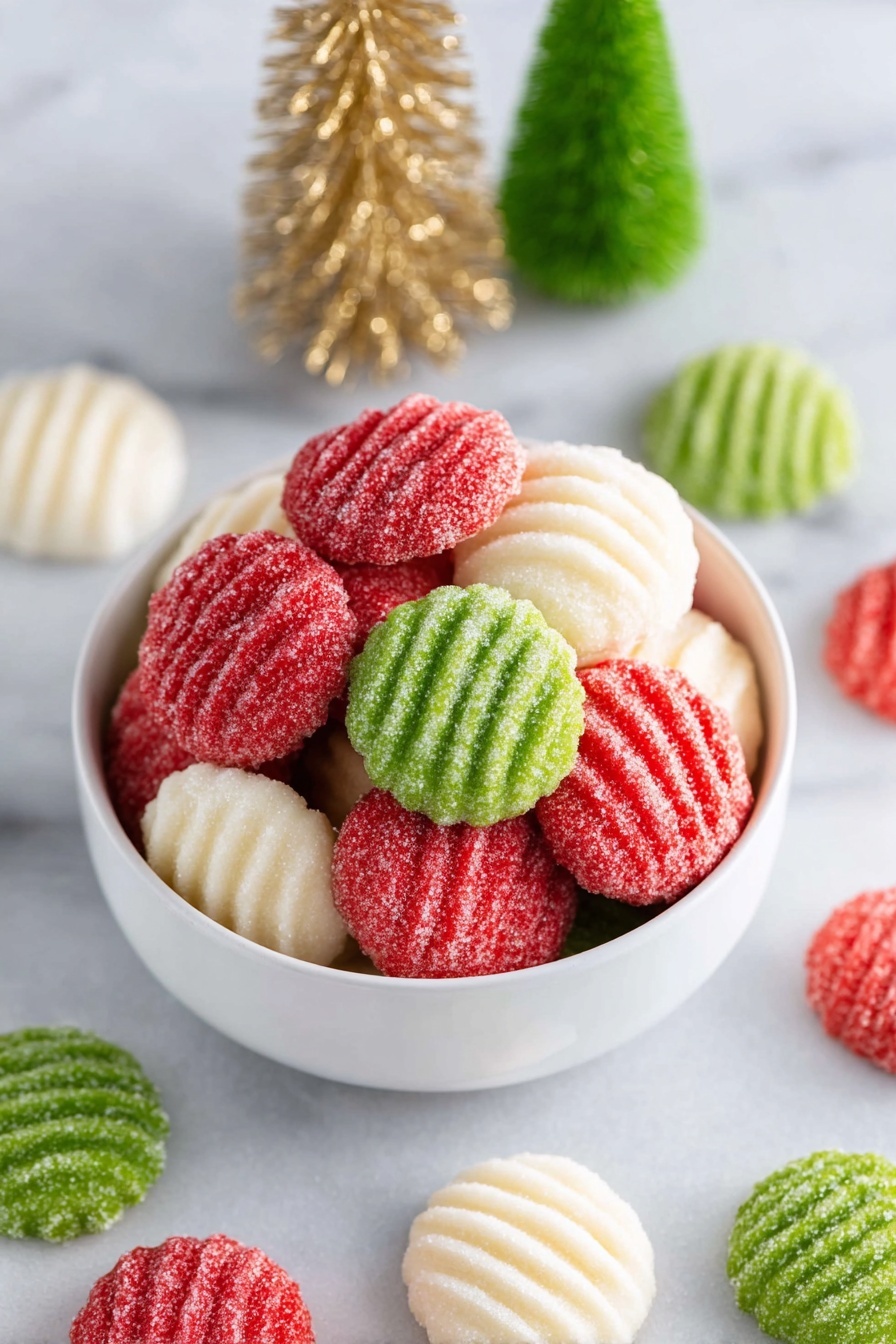
Garnishes
I usually keep it simple with a light dusting of extra granulated sugar right before serving — it adds sparkle and a delightful initial crunch. Sometimes, I scatter a few crushed peppermint candies around the serving platter for a festive touch.
Side Dishes
These peppermint patties pair beautifully with hot cocoa or a warm spiced tea. I enjoy serving them alongside soft gingerbread cookies or buttery shortbread for a contrasting texture and flavor combo.
Creative Ways to Present
One memorable Christmas, I arranged these patties in a festive wreath pattern on a silver platter, alternating red, green, and white candies. Another favorite is serving them in mini glass jars tied with holiday ribbons — perfect for gifting neighbors or coworkers!
Make Ahead and Storage
Storing Leftovers
I store leftover peppermint patties in an airtight container in the fridge — this keeps them fresh and chewy for up to two weeks. Just be sure to layer parchment paper between layers to prevent sticking.
Freezing
These candies freeze well! I place them in a freezer-safe box separated by parchment, then thaw in the fridge overnight before enjoying. They maintain their texture and flavor perfectly, which is a lifesaver during busy holiday prep.
Reheating
No reheating needed here — just bring them to room temperature after refrigeration or thawing, and they’re soft and ready to savor, just like fresh-made.
Frequently Asked Questions:
Absolutely! Gel food coloring is fantastic for this recipe because it gives more vibrant hues without adding extra moisture, which helps keep the dough from becoming too sticky. Just add a little at a time until you reach your desired color.
Stored properly in an airtight container in the refrigerator, these peppermint patties last for up to two weeks. For longer storage, freezing them is a great option, and they’ll keep well for up to three months.
The key is to add powdered sugar gradually and knead carefully. If the dough feels sticky, sprinkle a little extra powdered sugar while kneading. If it gets too stiff, a tiny bit of cream cheese or butter can help soften it back up.
Yes! You can make them a day or two before your event. Let them dry at room temperature for up to 24 hours after shaping, then store in the refrigerator until ready to serve. They even freeze well if you want to prepare weeks in advance.
Final Thoughts
This Festive Peppermint Patties Recipe holds a special spot in my holiday traditions because it’s so approachable and endlessly customizable. I hope you’ll find the same joy I do when you see those colorful little discs come together and taste that cool peppermint burst. Give it a try and watch it become your own festive favorite to share year after year!
Print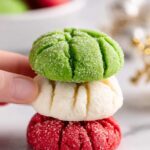
Festive Peppermint Patties Recipe
- Prep Time: 15 minutes
- Cook Time: 0 minutes
- Total Time: 1 hour 15 minutes
- Yield: 100 candies
- Category: Dessert
- Method: No-Cook
- Cuisine: American
- Diet: Vegetarian
Description
These Christmas Mints are festive, colorful peppermint candies made with cream cheese, butter, and powdered sugar. Perfect for holiday celebrations, they feature vibrant red, green, and white colors and a refreshing peppermint flavor. The candies are easy to prepare, require no baking, and come out with a pretty striped pattern made by a fork. They store well in the refrigerator or freezer, making them ideal for making ahead and gifting.
Ingredients
Main Ingredients
- ⅓ cup granulated sugar
- 4 ounces cream cheese, room temperature
- 2 tablespoons unsalted butter, room temperature
- 2 tablespoons light/clear corn syrup
- 1 teaspoon peppermint extract
- 4¼ cups powdered sugar, divided
- 6 drops green liquid food coloring
- 6 drops red liquid food coloring
Instructions
- Prepare baking tray: Line a large rimmed baking tray with parchment paper and place the granulated sugar into a small bowl. Set aside.
- Mix wet ingredients: In a large mixing bowl, beat cream cheese, unsalted butter, corn syrup, and peppermint extract on low speed for 1 minute until smooth.
- Add powdered sugar: Slowly add 4¼ cups powdered sugar half a cup at a time with the mixer on low. When the dough becomes thick, switch to a spatula or wooden spoon to finish mixing by hand.
- Prepare workspace: Spread a piece of parchment paper on a clean counter and sprinkle ¼ cup powdered sugar onto it. Turn out the dough onto the paper.
- Divide and color dough: Divide dough into three equal parts. Make shallow wells in the centers of two dough balls; add red food coloring to one and green to the other. Leave the third dough ball white.
- Knead colored dough: Knead the red and green dough balls carefully until color is evenly distributed. Add up to ¼ cup additional powdered sugar as needed to reduce stickiness. Knead white dough with 1-2 tablespoons powdered sugar if necessary.
- Form ropes: Roll each colored dough ball into an 18-inch rope about 1 inch thick.
- Slice dough: Cut each rope into ½-inch slices until all dough is sliced.
- Shape balls: Roll each slice between your palms to form small balls. Set aside.
- Coat in sugar: Toss 2-3 dough balls at a time in the prepared granulated sugar bowl, then place on the lined baking tray. Repeat until all balls are coated and arranged.
- Flatten and pattern: Using the tines of a fork, lightly press down each peppermint ball into flat discs, leaving a striped pattern on top.
- Dry candies: Allow the peppermint patties to sit at room temperature on the tray for up to 24 hours to dry and set before serving.
Notes
- Yields approximately 100 peppermint candies.
- Store in an airtight container in the refrigerator for up to 2 weeks.
- For longer storage, freeze in a freezer-safe container for up to 3 months; thaw in the refrigerator before serving.
- You can add up to ½ teaspoon of liquid food coloring for deeper, richer colors.
- Adjust powdered sugar quantity as needed to achieve a dough that is firm but not sticky.
- Gel food coloring works well for vibrant colors and adds less moisture to the dough compared to liquid coloring.
- This recipe requires no baking and is great for making in advance or gifting during holidays.
Nutrition
- Serving Size: 1 candy
- Calories: 25 kcal
- Sugar: 3 g
- Sodium: 15 mg
- Fat: 1.2 g
- Saturated Fat: 0.7 g
- Unsaturated Fat: 0.4 g
- Trans Fat: 0 g
- Carbohydrates: 3.5 g
- Fiber: 0 g
- Protein: 0.3 g
- Cholesterol: 5 mg


Leave a Reply