Nothing feels quite as comforting as a cookie that surprises you at every bite—that's exactly what the Kitchen Sink Cookies Recipe delivers. It's packed with all sorts of delicious goodies and textures, making it a fun, unforgettable treat for any occasion.

Jump to:
Why You'll Love This Recipe
From the moment I made these cookies, I knew they’d become a staple in my kitchen. This recipe brings together so many flavors and textures that your taste buds will feel like they’re on a joyful rollercoaster. If you want a cookie that’s both nostalgic and exciting, this one checks all the boxes.
- Unexpected Mix-ins: This cookie combines sweet, salty, crunchy, and chewy ingredients for a full sensory experience.
- Perfect Texture: The addition of corn starch and careful butter temperature means these cookies are thick yet tender.
- Festive and Fun: Holiday sprinkles and colorful mix-ins make these an instant crowd-pleaser, especially around festive seasons.
- Easy to Customize: You can swap ingredients around to put your own spin on this kitchen classic.
Ingredients & Why They Work
Every ingredient in the Kitchen Sink Cookies Recipe has a purpose, working together to deliver that perfect balance of flavor and texture. Plus, I’ve learned a few tips about choosing the best versions and how to prep them.
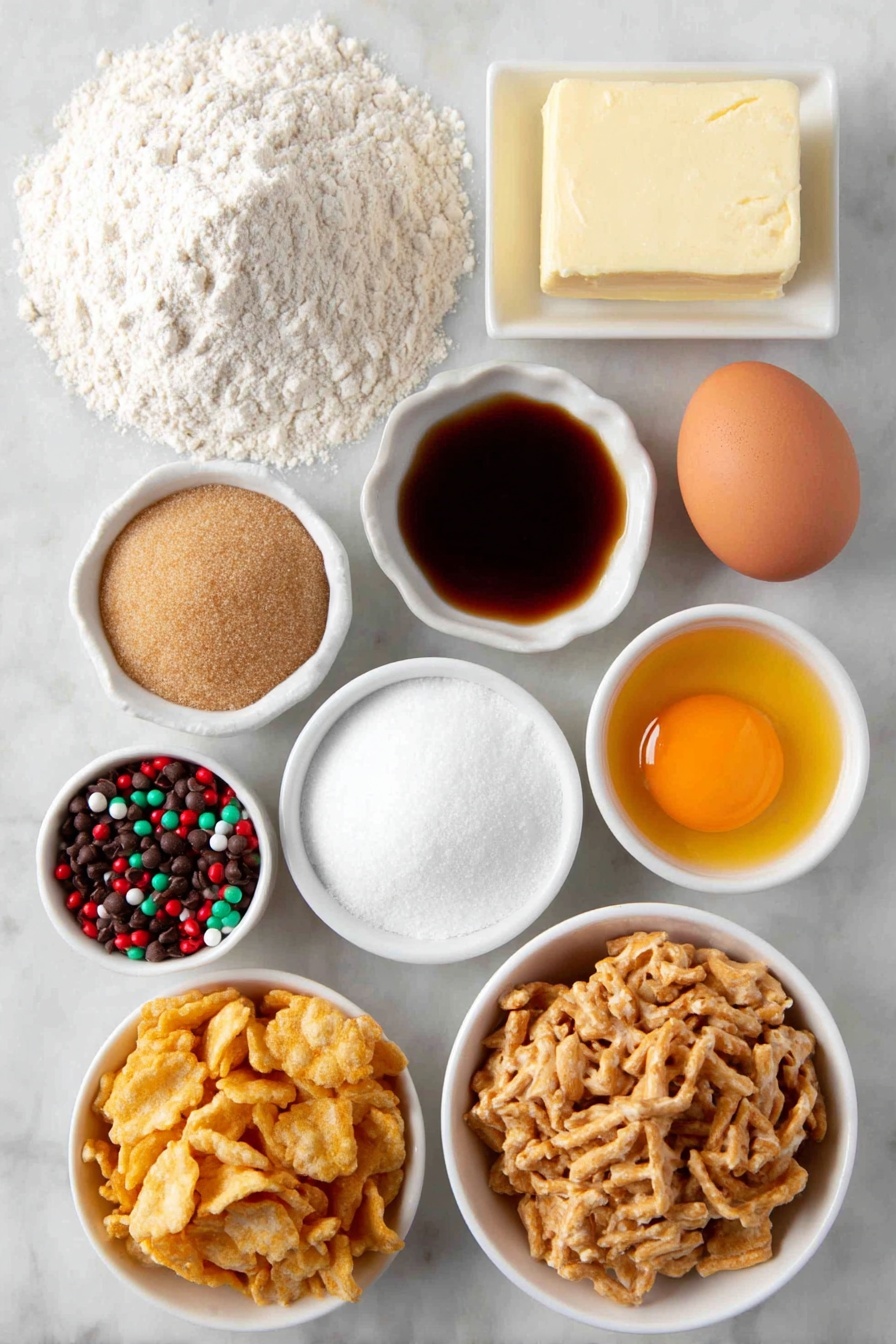
- All-purpose flour: This gives structure to your cookie while letting all those mix-ins shine.
- Baking soda: Helps with spread and rise for that ideal texture.
- Cornstarch: Don’t skip this—it’s the secret ingredient for soft, thick cookies.
- Salt: A little salt brings out the sweetness and enhances all the flavors.
- Unsalted butter: Room temperature butter is key. It should be cool but soft to prevent spreading and ensure fluffiness.
- Light brown sugar: Adds moisture and caramel notes that are so satisfying.
- Granulated sugar: Balances sweetness and helps with the cookie’s chewy texture.
- Egg and egg yolk: The duo provides richness and binds everything together nicely.
- Vanilla extract: Always brings depth and warmth to any cookie.
- Semi-sweet chocolate chips: You can mix in white or chopped chocolates for variety.
- Toffee bits or holiday M&Ms: For that seasonal pop and crunch, plus a splash of color.
- Crushed potato chips: Adding a salty, crispy surprise in every bite.
- Chopped pretzels: More salty crunch and texture contrast.
- Holiday jimmies (sprinkles): These hold up in the oven without melting or bleeding—trust me, I tried other sprinkles that fail.
Make It Your Way
One thing I really enjoy about the Kitchen Sink Cookies Recipe is how you can make it your own. I love switching up the mix-ins based on what I have at home or the time of year.
- Variation: I’ve replaced toffee bits with chopped salted peanuts for an extra nutty crunch—delicious and it gives the cookie a more rustic feel.
- Dietary twist: If you want gluten-free, swap the flour for a 1:1 gluten-free blend. Just watch the dough closely as it might bake slightly differently.
- Seasonal spin: Around Halloween, I swap in orange and black sprinkles. In summer, dried cranberries and white chocolate chips make a fresh, tangy change.
Step-by-Step: How I Make Kitchen Sink Cookies Recipe
Step 1: Getting the Dry Ingredients Ready
Start by whisking together the flour, baking soda, cornstarch, and salt in a medium bowl. I always make sure to whisk thoroughly to evenly distribute everything—it sets the stage for the perfect cookie texture.
Step 2: Creaming the Butter and Sugars
Using a mixer, you want to beat the softened butter with light brown and granulated sugar until the mixture is light and creamy. This usually takes about 2-3 minutes. I find this step critical because it traps air for a fluffier cookie, so don’t rush it!
Step 3: Adding Eggs and Vanilla
Next, mix in the egg, egg yolk, and vanilla extract. I like to pause halfway and scrape down the sides with a spatula to make sure it all blends evenly. This helps the dough come together beautifully without any streaks.
Step 4: Combining the Dry and Wet Ingredients
Turn your mixer to low and slowly add the dry ingredients to the wet. Mix just until you no longer see flour; over-mixing can make your cookies tough, so keep an eye on the texture here.
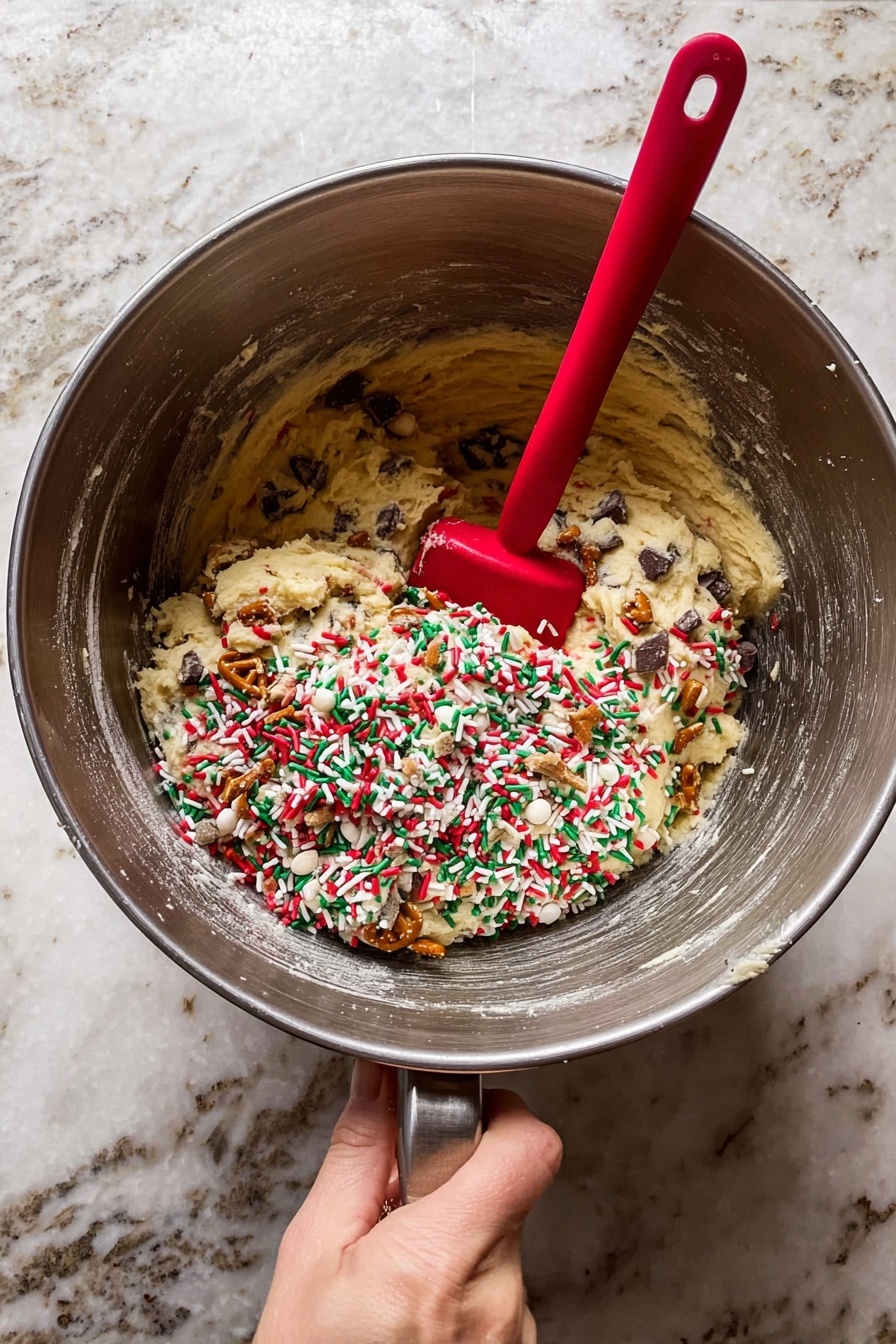
Step 5: Stirring in the Magic Mix-ins
This is my favorite part—fold in the chocolate chips, toffee bits, crushed potato chips, chopped pretzels, and festive jimmies using a spatula. The dough will look overstuffed and wow-worthy—in a good way!
Step 6: Scooping and Baking
Use a large cookie scoop or a scant ¼ cup measuring cup to portion the dough onto parchment-lined baking sheets. I roll each scoop into a tall oval rather than a ball—this trick makes for thicker cookies that hold their shape perfectly.
Bake at 350°F for about 10-12 minutes until edges turn a gentle golden and the tops are just set. Let the cookies rest for about 5 minutes, then gently press any extra toppings on top while still warm for that picture-perfect look.
Finally, transfer them to a wire rack to cool completely. If you can resist, they’re stunning even once cooled!
Top Tip
Through my many batches of these cookies, I’ve learned that small tweaks make a big difference. These tips helped me nail the texture and flavor every time, and I hope they help you too!
- Butter Temperature Matters: Leave your butter out for 30-60 minutes until it’s cool but soft—not melted. This stops the cookies from spreading too thin.
- Use Holiday Jimmies: I tried regular sprinkles before and the colors bled everywhere. The classic jimmies keep their shape and look festive!
- Don’t Overmix: When adding the flour, mix until just combined for tender cookies that aren’t gluey.
- Shape for Thickness: Rolling dough into ovals instead of balls gives you thicker, bakery-style cookies each time.
How to Serve Kitchen Sink Cookies Recipe

Garnishes
I love dusting these cookies with a light sprinkle of flaky sea salt right after baking—not too much, just enough to highlight the salty-sweet magic inside. For festive gatherings, adding a few extra holiday jimmies on top gives a fun pop of color.
Side Dishes
These cookies pair beautifully with a cold glass of milk or a cozy mug of coffee. I’ve also served them alongside vanilla ice cream for a decadent dessert that’s a guaranteed crowd-pleaser.
Creative Ways to Present
For holiday parties, I like putting these cookies in decorative tins layered with parchment paper. Another fun idea is stacking smaller cookies between layers of frosting or Nutella to make mini cookie sandwiches—it’s always a hit!
Make Ahead and Storage
Storing Leftovers
I store leftover cookies in an airtight container at room temperature for up to 5 days. Just make sure the container isn’t too tight so the cookies don’t get too soft. If they start to lose their crunch, popping them in the oven briefly refreshes them beautifully.
Freezing
You can freeze both baked cookies and the dough. For dough, I scoop balls onto a tray and freeze them before transferring to a freezer bag—this way, you can bake fresh cookies anytime by adding a couple extra minutes to the baking time.
Reheating
To reheat leftover cookies, I pop them in a 300°F oven for about 5 minutes. This wakes up the chocolate and restores some of that fresh-baked chewiness without making them hard or dry.
Frequently Asked Questions:
This cookie earned its name because it includes a little bit of everything you might find in your kitchen or pantry — chocolate, toffee, pretzels, chips, and sprinkles. The combination creates a unique, complex flavor and texture every time.
Absolutely! One of the best things about this Kitchen Sink Cookies Recipe is its flexibility. You can swap chocolate chips for white chocolate, pretzels for nuts, or toffee for crushed candy canes. Just keep a good balance of sweet and salty for best results.
Room temperature butter ensures the dough creams properly with the sugars and helps control spreading in the oven. Too warm butter means flat cookies, while too cold makes mixing difficult. Aim for cool but soft butter for perfect cookies.
Yes! You can cover the dough and refrigerate it for up to 2 days before baking. This actually helps deepen the flavors. Just note that the potato chips and pretzels might soften slightly in the dough over time.
Final Thoughts
This Kitchen Sink Cookies Recipe has become one of those treats I love sharing with friends and family—not just because it tastes amazing, but because each bite tells a story of comfort, creativity, and a little bit of fun chaos in the kitchen. I hope you give it a try and discover your own favorite mix-ins and memories along the way.
Print
Kitchen Sink Cookies Recipe
- Prep Time: 15 minutes
- Cook Time: 12 minutes
- Total Time: 27 minutes
- Yield: 16 servings
- Category: Dessert
- Method: Baking
- Cuisine: American
- Diet: Vegetarian
Description
Kitchen Sink Cookies are a delightful and indulgent treat packed with a variety of mix-ins including chocolate chips, toffee bits, potato chips, pretzels, and festive holiday jimmies. These cookies offer a perfect balance of sweet and salty flavors with a thick, chewy texture and crispy edges, making them a festive favorite for any occasion.
Ingredients
Dry Ingredients
- 2 ¼ cups 270g all-purpose flour
- 1 teaspoon baking soda
- 1 Tablespoon 8g cornstarch
- ½ teaspoon salt
Wet Ingredients
- ¾ cup 170g unsalted butter, room temperature
- ¾ cup 150g light brown sugar, packed
- ¼ cup 50g granulated sugar
- 1 egg, room temperature
- 1 egg yolk, room temperature
- 1 teaspoon vanilla extract
Mix-ins
- ½ cup semi-sweet chocolate chips (chopped chocolate or white chocolate chips work too)
- ½ cup toffee bits or red & green M&Ms
- ¾ cup crushed potato chips
- ½ cup chopped pretzels
- ¼ cup holiday jimmies (not nonpareils)
Instructions
- Preheat the oven: Preheat the oven to 350°F and line baking sheets with parchment paper to prepare for baking.
- Whisk dry ingredients: In a medium bowl, whisk together the all-purpose flour, baking soda, cornstarch, and salt until well combined.
- Cream butter and sugars: In a large bowl, use a handheld or stand mixer fitted with a paddle attachment to beat the room temperature unsalted butter, light brown sugar, and granulated sugar together until the mixture is light and creamy, about 2 to 3 minutes.
- Add the wet ingredients: Add the egg, egg yolk, and vanilla extract to the butter mixture and beat for 1 to 2 minutes until light and fluffy, scraping down the sides of the bowl as needed.
- Combine dry and wet ingredients: With the mixer on low speed, slowly add the dry ingredients to the wet ingredients and mix until just combined.
- Incorporate the mix-ins: Stir in the semi-sweet chocolate chips, holiday jimmies, toffee bits, crushed potato chips, and chopped pretzels using a rubber spatula until evenly distributed throughout the dough.
- Scoop and shape the dough: Use a large cookie scoop or about a scant ¼ cup to scoop out dough balls. Roll each dough ball into a tall oval shape rather than a round ball to create thicker cookies, then place them on the prepared baking sheets.
- Bake the cookies: Bake the cookies in the preheated oven for 12 minutes, until the edges are slightly golden and the tops are just set for a perfect texture.
- Finish and cool the cookies: Immediately after removing from the oven, gently swirl the rim of a large glass around the outside edge of each warm cookie to create a perfect circle and press any extra topping pieces on top. Let the cookies cool on the baking sheet for 5 minutes before transferring them to a cooling rack to cool completely.
- Enjoy and share feedback: Once cooled, enjoy your Kitchen Sink Cookies and consider leaving a review to share your experience!
Notes
- Room temperature butter should be cool to the touch, around 69°F, to prevent the cookies from spreading too much during baking. Leave butter out for 30 to 60 minutes before using.
- Use holiday jimmies for sprinkles, as they do not melt or bleed color into the dough while baking.
- Feel free to swap or add mix-ins like white chocolate chips, red and green M&Ms, chocolate chunks, salted peanuts, or crushed peppermint for a different flavor twist.
- You can make the dough ahead of time and store it covered in the fridge for up to 2 days; note that some chips may lose crunchiness.
- Baked cookies can be stored in an airtight container for up to 5 days or frozen for up to 2 months; thaw uncovered before serving.
- Cookie dough balls can be frozen and stored in a freezer bag for up to 3 months. Bake frozen dough balls by adding 1 to 2 extra minutes to the baking time.
Nutrition
- Serving Size: 1 cookie
- Calories: 250 kcal
- Sugar: 18 g
- Sodium: 150 mg
- Fat: 12 g
- Saturated Fat: 7 g
- Unsaturated Fat: 4 g
- Trans Fat: 0 g
- Carbohydrates: 32 g
- Fiber: 1 g
- Protein: 3 g
- Cholesterol: 45 mg


Leave a Reply