There’s just something mesmerizing about the bold, contrasting squares of these cookies — and when those flavors are mint and chocolate? Magic. This Mint Chocolate Checkerboard Cookies Recipe is not just a treat to eat, but a feast for the eyes, perfect for impressing your friends or savoring a special homemade moment.

Jump to:
- Why You'll Love This Recipe
- Ingredients & Why They Work
- Make It Your Way
- Step-by-Step: How I Make Mint Chocolate Checkerboard Cookies Recipe
- Top Tip
- How to Serve Mint Chocolate Checkerboard Cookies Recipe
- Make Ahead and Storage
- Frequently Asked Questions:
- Final Thoughts
- Mint Chocolate Checkerboard Cookies Recipe
Why You'll Love This Recipe
I adore this recipe because it nails both flavor and fun presentation without feeling intimidating. You'll find the process straightforward, and the payoff is always worth the little extra effort. Plus, these cookies disappear fast—everyone goes nuts for the minty kick and the classic chocolate.
- Visual Impact: The checkerboard pattern is eye-catching and totally Instagram-worthy, adding that wow factor to your cookie tray.
- Flavor Balance: Fresh peppermint melds beautifully with rich chocolate, giving each bite a refreshing yet indulgent taste.
- Textural Delight: Crisp edges with a tender center make every cookie perfectly satisfying.
- Customizable & Fun to Make: You get to play with coloring and shaping, making this a great baking project for anyone who loves a hands-on dessert.
Ingredients & Why They Work
This recipe comes together with simple pantry staples, but the magic lies in how each ingredient plays a role. The butter and sugar cream into a luscious base, the peppermint extract adds a fresh, cooling zing, and cocoa powder packs that deep chocolate flavor.

- All-purpose flour: Provides the perfect structure without being too dense—spoon and level to avoid adding too much.
- Baking powder: Just enough to give the cookies a nice lift without spreading too thin.
- Salt: Enhances the chocolate and mint, balancing sweetness.
- Unsalted butter: The base of flavor and texture—softened, not melted, to cream properly.
- Granulated sugar: Sweetness and crunch on the cookie surface, especially when combined with coarse sugar topping.
- Egg and egg yolk: Adds richness and helps bind everything together; saving the extra white for egg wash gives the cookies a lovely sparkle.
- Vanilla extract: Lifts and rounds out the flavors, subtly warming the mint and chocolate.
- Peppermint extract: The star of the mint dough—start with a teaspoon and adjust if you like it more or less punchy.
- Green food coloring (optional): Gives that perfect minty green shade for the checkerboard without affecting flavor; gel color works best.
- Cocoa powder: Unsweetened for pure chocolate taste; Dutch-process will give a smoother flavor, natural cocoa is slightly more tangy.
- Milk: Just a splash to loosen the cocoa dough; don't overdo it, or the dough will get too soft.
- Espresso powder (optional): Boosts chocolate flavor richness—trust me, a teaspoon here makes all the difference.
Make It Your Way
One of my favorite things about this Mint Chocolate Checkerboard Cookies Recipe is how easy it is to personalize. Whether you want to dial up the minty freshness or sneak in some extra chocolate, it’s totally flexible.
- Variation: I once added finely chopped dark chocolate to the chocolate dough for extra texture and a rich surprise inside—highly recommend if you love a little crunch.
- Dietary Tip: Swap the butter for a vegan alternative and use a flax egg to make these dairy-free—just expect a slightly different texture but just as tasty.
- Seasonal Twist: Around the holidays, I add a pinch of cinnamon to the mint dough—it’s so cozy and unexpected.
Step-by-Step: How I Make Mint Chocolate Checkerboard Cookies Recipe

Step 1: Whip Up Your Base Cookie Dough
Start by whisking your dry ingredients—flour, baking powder, and salt—together. Then, cream the softened butter and sugar on medium-high speed until the mixture is light and fluffy. This usually takes about 3 minutes; trust me, don’t rush this step because it makes the cookies tender and helps them spread just right. Next, add your egg, yolk, and vanilla, beating until fully combined. Scrape down the bowl edges to mix everything evenly before folding in the dry ingredients on low speed. The dough will be thick and sticky–that’s exactly what you want!
Step 2: Divide and Flavor Your Doughs
Divide the dough in half—roughly 2 cups each. For the mint dough, add peppermint extract and just a drop of green food coloring to the first half, mixing it until smooth. I recommend starting with one drop of gel food dye and adding a bit more if you want a deeper color; it's easy to overdo it. Then for the chocolate dough, blend in cocoa powder, milk, and espresso powder if using. Mix until evenly colored and luscious.
Step 3: Shape Your Blocks and Chill
On a lightly floured surface, gently shape each dough half into a 6-inch long rectangle, about 2 inches wide, and 2 inches tall. It’s sticky, so lightly flour your hands but avoid over-flouring the dough—it should still be pliable. Wrap in plastic and refrigerate for just 1 hour. Take it from me: chilling too long makes them brittle and tricky to shape later, so this is a key step!
Step 4: Craft the Checkerboard Pattern
Remove the chilled doughs and slice each block lengthwise into 3 strips. Then cut those into thirds so you have 9 strips from each dough. Trim any rounded edges—I always do this to make those neat squares that make the pattern pop. On your work surface, alternate strips of mint and chocolate dough tightly together to build your checkerboard. You’ll make two blocks, one starting with mint and the other starting with chocolate dough for that perfect alternating effect. Press the strips firmly, but gently—soft dough here helps the pieces meld.
Step 5: Chill the Checkerboard Blocks
Wrap your blocks and chill again for at least 2 hours, or up to 4 days. This step solidifies your pattern and makes slicing easier without losing the design.
Step 6: Slice, Add Sparkle, and Bake
Preheat your oven to 350°F (177°C). Slice each checkerboard block into 12-18 cookies, about ½-inch thick (or ⅓-inch if you want thinner cookies). For the cleanest look, I trim edges after slicing. Place cookies on parchment-lined sheets spaced 2-3 inches apart. Mix your reserved egg white with water, brush lightly over tops, and sprinkle with coarse sugar for that perfect bake-time sparkle and crunch. Bake for 12-14 minutes until edges are just lightly browned. Let cool on the sheet for five minutes before transferring to a wire rack—resist the urge to handle while hot, or they might break.
Top Tip
After making this Mint Chocolate Checkerboard Cookies Recipe several times, I learned that the chilling time and dough pliability are absolutely crucial. Don’t skip those timing steps, or your pattern can get messy!
- Chill Just Right: After forming blocks, chill exactly 1 hour before slicing strips to keep the dough soft enough to bend without cracking.
- Trim for Neatness: Trim rounded edges when assembling and slicing to guarantee crisp checkerboard lines.
- Don’t Skip Egg Wash: The egg wash with coarse sugar adds that bakery-level shimmer and crunch everyone loves.
- Handle Dough Gently: Press strips but avoid stretching—they should merge naturally without warping your pattern.
How to Serve Mint Chocolate Checkerboard Cookies Recipe

Garnishes
Personally, I keep it simple. The sparkle from the coarse sugar is my go-to garnish because it makes the cookies feel special without masking their vibrant pattern or flavor. On occasion, I sprinkle a tiny bit of crushed candy canes on top during winter for that festive mint crunch.
Side Dishes
Serve these cookies alongside a cup of hot cocoa or mint-infused tea. For holidays, I love pairing them with a scoop of vanilla ice cream or whipped cream to balance the crispness with creamy softness.
Creative Ways to Present
I’ve arranged these checkerboard cookies stacked in clear glass jars or on tiered platters to showcase that pattern from all angles during parties. For gifting, wrap them individually in cellophane tied with green ribbon to match the mint vibes—it’s a gift guaranteed to impress.
Make Ahead and Storage
Storing Leftovers
Store your baked cookies in an airtight container at room temperature, and they’ll stay fresh and chewy for up to a week. I find layering them between parchment paper keeps the pattern intact and prevents sticking.
Freezing
I love freezing my checkerboard dough blocks wrapped tightly in plastic wrap. When I want fresh cookies, I thaw overnight in the fridge and bake the next day—easy and just as delicious. You can also freeze baked cookies for up to 3 months; just thaw slowly for best texture.
Reheating
To bring frozen or refrigerated cookies back to life, I heat them in a warm oven at 300°F for about 5 minutes. It crisps the edges and softens the center, making them taste freshly baked.
Frequently Asked Questions:
Absolutely! While peppermint extract is traditional here, you can experiment with other flavors like orange or almond extract, but keep in mind it will change the cookie's characteristic identity and taste.
Make sure to chill the dough only until it’s firm but still pliable. Over-chilling makes it brittle. Handle the strips gently and don’t stretch them when pressing together—press lightly to join doughs.
Yes! You can shape and chill the checkerboard dough blocks for up to 4 days in the refrigerator. They also freeze well up to 3 months, making this recipe perfect for advance preparation.
Espresso powder intensifies the chocolate flavor, making it richer and more complex without adding coffee taste. It’s a simple trick to elevate your cookies.
Final Thoughts
This Mint Chocolate Checkerboard Cookies Recipe has become one of my go-to projects when I want to delight friends or just treat myself with something extra special. The blend of flavors, the playful pattern, and the crisp yet tender texture make these cookies unforgettable. You’ll enjoy every step—from mixing to shaping to eating—and I’m excited for you to try it out. Trust me, once you make these, you’ll want to bake them again and again!
Print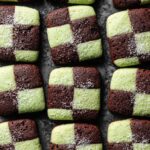
Mint Chocolate Checkerboard Cookies Recipe
- Prep Time: 4 hours 45 minutes
- Cook Time: 14 minutes
- Total Time: 5 hours
- Yield: 24 cookies
- Category: Dessert
- Method: Baking
- Cuisine: American
- Diet: Vegetarian
Description
Mint Chocolate Checkerboard Cookies combine classic buttery cookie dough with refreshing peppermint and rich chocolate, arranged in a striking checkerboard pattern perfect for festive occasions or gifting.
Ingredients
Base Cookie Dough
- 2 and ½ cups all-purpose flour (313g)
- ½ teaspoon baking powder
- ½ teaspoon salt
- 1 cup unsalted butter, softened (226g)
- 1 cup granulated sugar (200g)
- 1 large egg
- 1 egg yolk
- 1 and ½ teaspoons pure vanilla extract
Mint Dough
- 1 teaspoon peppermint extract
- 1 drop green food dye (optional)
Chocolate Dough
- 2 tablespoons unsweetened cocoa powder (10g)
- 1 tablespoon milk (15ml)
- 1 teaspoon espresso powder (optional)
Optional Topping
- 1 tablespoon water (15ml)
- ¼ cup coarse sugar (50g)
Instructions
- Prepare Dry Ingredients: Whisk together flour, baking powder, and salt in a medium bowl and set aside.
- Cream Butter and Sugar: In a large bowl, beat softened butter and granulated sugar on medium-high speed until light and fluffy, about 3 minutes.
- Add Eggs and Vanilla: Add the large egg, egg yolk, and vanilla extract to the creamed mixture and beat on high speed until fully combined, scraping the bowl as needed, about 1 minute.
- Combine Dough: Gradually mix dry ingredients into the wet mixture on low speed until combined into a thick, sticky dough.
- Divide Dough: Remove dough from the bowl and divide evenly into two portions, about 2 cups each.
- Make Mint Dough: Place one half of the dough in the mixing bowl, mix in peppermint extract and optional green food dye on low speed until evenly colored, then set aside.
- Make Chocolate Dough: Place the other half in the bowl, add cocoa powder, milk, and optional espresso powder, and mix on low speed until combined.
- Shape and Chill Dough: On a lightly floured surface, shape each dough portion into a 6-inch long, 2 inches wide and tall rectangle. Wrap in plastic wrap and refrigerate for 1 hour until firm but pliable.
- Create Checkerboard Blocks: Remove chilled dough, cut each block lengthwise into 3 equal strips, then cut each strip into thirds, making 9 strips from each dough. Trim edges for neatness. Arrange strips alternating mint and chocolate to form 6x3 checkerboard blocks, pressing strips tightly together. Make two blocks starting with different dough strips.
- Chill Blocks: Wrap blocks in plastic and refrigerate for 2 hours or up to 4 days.
- Preheat Oven and Prepare Baking Sheets: Preheat oven to 350°F (177°C). Line baking sheets with parchment paper or silicone mats.
- Slice and Prepare Cookies: Slice each block into 12 slices about ½ inch thick for thicker cookies or 18 slices about ⅓ inch thick for thinner cookies. Optional: brush with egg wash (from saved egg white mixed with water) and sprinkle with coarse sugar.
- Bake: Place cookies 2-3 inches apart on sheets and bake for 14 minutes or until edges are lightly browned.
- Cool: Let cookies cool on baking sheets for 5 minutes before transferring to wire racks to cool completely.
Notes
- Baked cookies can be frozen up to 3 months; thaw overnight in the fridge before serving.
- The checkerboard dough blocks can be chilled up to 4 days or frozen 3 months before baking.
- Use the extra egg white mixed with water as an egg wash to add sparkle and crunch when brushed on before baking.
- Trimming dough strips and cookie edges helps create neat, uniform checkerboard cookies; leftover scraps can be rolled out and baked separately.
- If dough chills longer than 1 hour initially, let it sit at room temperature 15-30 minutes before shaping for pliability.
Nutrition
- Serving Size: 1 cookie
- Calories: 150 kcal
- Sugar: 12 g
- Sodium: 70 mg
- Fat: 8 g
- Saturated Fat: 5 g
- Unsaturated Fat: 3 g
- Trans Fat: 0 g
- Carbohydrates: 18 g
- Fiber: 1 g
- Protein: 2 g
- Cholesterol: 30 mg


Leave a Reply