There’s something magical about the holidays that calls for a dessert both refreshing and festive. The No-Bake Peppermint Christmas Pie Recipe is exactly that—creamy, minty, and so quick to make, it’s become my go-to for holiday parties when I want something special without heating up the kitchen.

Jump to:
Why You'll Love This Recipe
This pie combines festive peppermint flavors with a luscious creamy texture that’s light but indulgent. I love that it’s no-bake—meaning minimal effort but maximum wow-factor on your holiday dessert table.
- Effortless Prep: No oven needed, which keeps your kitchen cool and your stress low during busy holiday cooking.
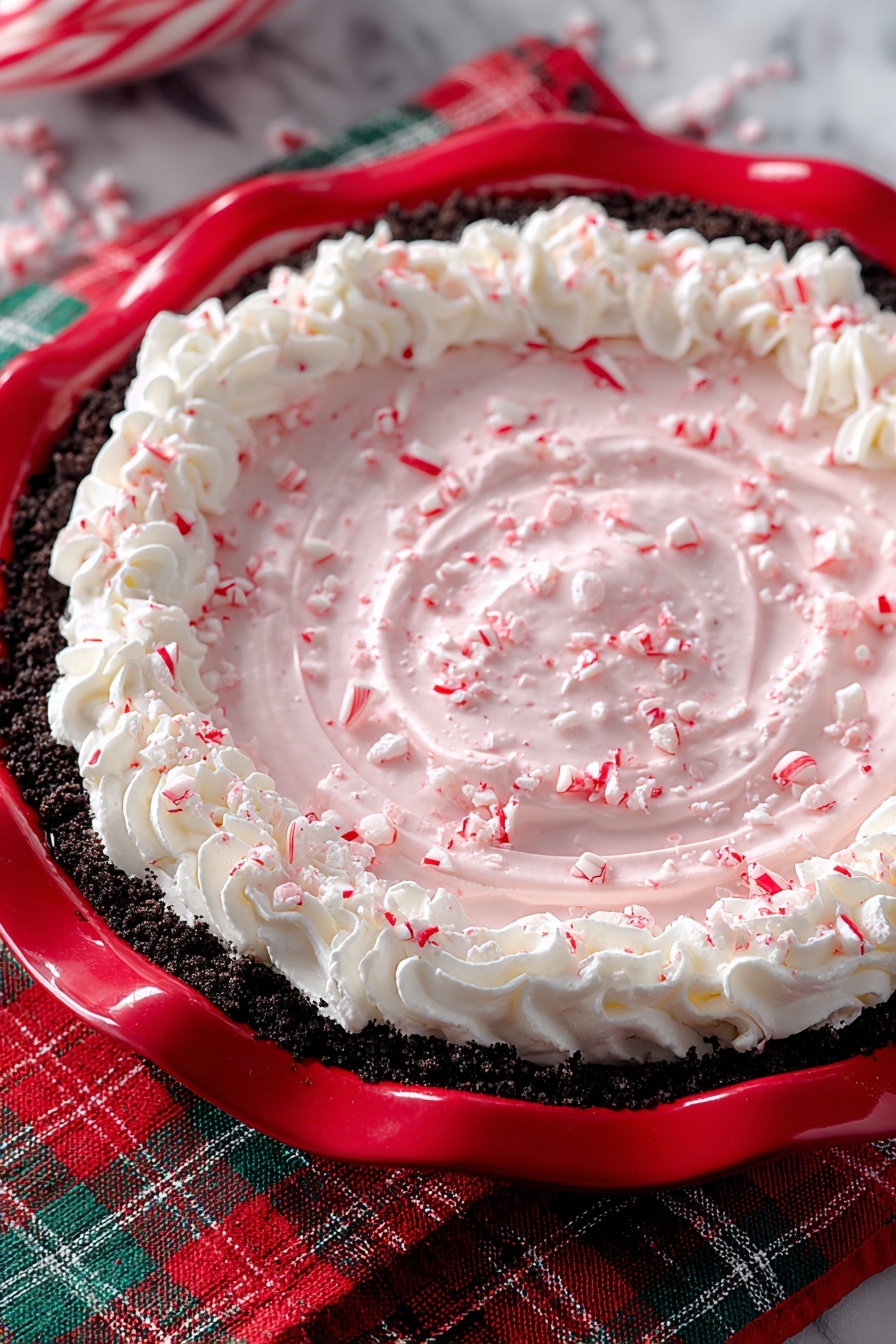
- Festive Flavor: >The crushed peppermint candy adds crunch and bursts of minty freshness that scream Christmas.
- Creamy & Dreamy: The blend of cream cheese and whipped cream creates a silky, melt-in-your-mouth texture.
- Easy to Customize: You can tweak the peppermint amount or swap the crust for your favorite to suit your taste.
Ingredients & Why They Work
Each ingredient here plays a special role, setting the stage for that cool, creamy peppermint pie everyone asks for again and again. Picking quality vanilla and cream cheese makes all the difference in smoothness and flavor.

- Oreo pie crust: Provides a rich, chocolaty base that pairs perfectly with mint.
- Vanilla extract: Adds warmth and depth, balancing out the peppermint.
- Cream cheese: Gives the filling body and tang, creating smooth richness.
- Crushed peppermint candy: Offers a fantastic crunch and that unmistakable minty kick.
- Powdered sugar: Sweetens without graininess and helps create a silky filling.
- Peppermint flavoring: Boosts the mint flavor beyond the candy for extra holiday cheer.
- Red food coloring: Turns the pie festive and fun, but it’s totally optional if you prefer natural tones.
- Heavy whipping cream: Whipped to stiff peaks, it’s the secret to the pie’s light, fluffy texture.
- Whipped topping (Cool Whip): Adds creamy, cloud-like topping and a perfect garnishing base.
Make It Your Way
I love to make this pie as written, but sometimes I jazz it up with extra peppermint candy on top or swap out the Oreo crust for gluten-free options when friends come over. Feel free to experiment—this pie is forgiving and fun!
- Variation: One year, I added a layer of crushed Andes mints right on the crust before filling the pie—it was a hit with guests who like a stronger mint flavor.
- Dietary tweak: For a dairy-free twist, try a dairy-free cream cheese and coconut whipped cream; it still has that festive spirit!
- Seasonal swap: During winter, adding a hint of cinnamon or nutmeg amps up warmth alongside the peppermint.
Step-by-Step: How I Make No-Bake Peppermint Christmas Pie Recipe
Step 1: Whip the Heavy Cream to Perfection
Start by whipping your heavy cream in a cold bowl until you get stiff peaks. This is crucial—it’s what makes the filling so light and airy. Take your time here; under-whipped cream can lead to a dense pie. I like to chill my beaters beforehand for extra fluffy results.
Step 2: Make the Cream Cheese Mixture Smooth & Minty
In a separate bowl, beat together cream cheese and powdered sugar until silky smooth—no lumps! Then blend in the red food coloring, vanilla, and peppermint extract evenly for that classic Christmas look and flavor. Gently fold in half the crushed peppermint candy, reserving the rest for topping.
Step 3: Combine Cream & Cheese Mixtures Gently
Slowly add your cream cheese mixture to the whipped heavy cream, mixing on low speed. You want everything to meld together without losing the fluffy texture. This step can make or break your pie’s perfect creaminess, so be gentle but thorough.
Step 4: Fill the Oreo Crust & Spread Evenly
Pour your combined filling into the Oreo crust. Use a spatula to smooth the top evenly—this not only looks pretty but helps the pie chill uniformly. Don’t rush this step when serving friends; presentation counts!
Step 5: Top, Garnish, & Chill
Spread a generous layer of thawed whipped topping over the pie, then sprinkle the remaining crushed peppermint candy on top for crunch and festive flair. Refrigerate the pie for at least 1-2 hours to let the flavors meld and the pie set properly. Patience really pays off here.
Top Tip
After making this No-Bake Peppermint Christmas Pie Recipe many times, I’ve learned a few tricks to ensure it turns out perfect every time. These tips save frustration and guarantee you a picture-perfect festive pie.
- Use room temperature cream cheese: It blends easier and creates a smoother filling without lumps.
- Don’t skip chilling: The pie needs time in the fridge to firm up and let the peppermint flavor deepen.
- Whip cream properly: Under- or over-whipped cream can mess up your texture; I stop when stiff peaks hold their shape but still look shiny.
- Crush peppermint candy finely: Large chunks can overpower the pie and be hard to cut through smoothly.
How to Serve No-Bake Peppermint Christmas Pie Recipe

Garnishes
I usually stick with a simple sprinkle of crushed peppermint candies because they add such a satisfying crunch and vibrant visual contrast especially against the white cool whip. Sometimes I toss on a few mini candy canes broken up for a whimsical touch that guests love.
Side Dishes
This pie is a lovely finish after a rich holiday meal. I like to pair it with lighter sides like spiced hot apple cider or a fresh fruit salad to balance all that creamy sweetness.
Creative Ways to Present
For parties, I’ve served this pie in individual clear cups topped with crushed peppermint and a candy cane toothpick—so cute and perfectly portioned! You could also swirl red and white whipped cream on top for a candy-cane swirl effect.
Make Ahead and Storage
Storing Leftovers
I keep leftovers well covered in the fridge for up to 3 days. The texture holds up beautifully, and the flavors even get better after resting overnight. Just be sure to keep it chilled until serving.
Freezing
While I haven’t frozen the entire pie, I’ve frozen individual slices wrapped tightly, and they thaw nicely in the fridge overnight without losing texture—perfect for prepping ahead during holiday rush.
Reheating
This pie is best enjoyed cold, so I recommend taking it straight from the fridge. Letting it sit too long at room temp can soften it too much. If it feels too firm, leave it out for about 10 minutes before slicing for cleaner cuts.
Frequently Asked Questions:
Absolutely! While an Oreo crust is my favorite for that chocolate-mint combo, you can use graham cracker crust, ginger snap crust, or even a gluten-free crust to suit your preferences.
For the best consistency and flavor melding, chilling the pie for at least 1-2 hours is crucial. If you have more time, you can chill it overnight with great results.
Yes! This No-Bake Peppermint Christmas Pie Recipe actually benefits from resting in the fridge. Prepare it a day in advance to save time on the day of your event.
Start with a well-chilled bowl and beaters, use cold heavy cream, and beat on medium-high speed. Stop as soon as the cream forms peaks that hold their shape but aren’t dry or grainy. Practice really helps!
Final Thoughts
The No-Bake Peppermint Christmas Pie Recipe has become one of my cherished holiday classics because it’s so simple yet feels luxurious. Sharing it always sparks joy and those festive smiles—exactly why I make it year after year. You’ll love keeping this pie in your holiday repertoire too, whether as a last-minute delight or a star on your dessert table. Give it a try and savor that pepperminty Christmas magic!
Print
No-Bake Peppermint Christmas Pie Recipe
- Prep Time: 30 minutes
- Cook Time: 0 minutes
- Total Time: 2 hours 30 minutes
- Yield: 8 servings
- Category: Dessert
- Method: No-Cook
- Cuisine: American
- Diet: Vegetarian
Description
A festive and creamy no-bake Christmas peppermint pie featuring a smooth peppermint-infused cream cheese filling into a crunchy Oreo crust, topped with whipped topping and crushed peppermint candies for a refreshing holiday treat.
Ingredients
For the crust:
- 1 Oreo pie crust
For the filling:
- 2 teaspoon vanilla extract (McCormick pure)
- 2 (8 oz) packages cream cheese, softened to room temperature
- ½ cup crushed peppermint candy
- 1.5 cups powdered sugar
- 1 teaspoon peppermint flavoring
- 10 drops red food color
- 1 cup heavy whipping cream
For the topping and garnish:
- 1 tub whipped topping (like Cool Whip), thawed
- Crushed peppermint candy for garnish
Instructions
- Whip the Heavy Cream: In a large bowl, whip the heavy cream until stiff peaks form. Set the whipped cream aside for later use.
- Prepare the Cream Cheese Mixture: In a medium bowl, cream together the powdered sugar and softened cream cheese until smooth. Add the red food coloring, vanilla extract, and peppermint flavoring, mixing until the color and flavor are well combined. Fold in ½ cup of crushed peppermint candy bits.
- Combine the Mixtures: Gently add the cream cheese mixture to the whipped cream. Using a low speed on a mixer, blend the two mixtures thoroughly to achieve a smooth consistency.
- Fill the Oreo Crust: Pour the combined filling into the Oreo crust, spreading it evenly to form the pie base.
- Garnish and Chill: Spread a layer of thawed whipped topping over the pie and sprinkle crushed peppermint candy on top for texture and decoration. Refrigerate the pie for 2 hours or until set before serving.
Notes
- Make sure the cream cheese is softened to room temperature for a smooth filling without lumps.
- Whip the heavy cream until stiff peaks form to ensure the filling is stable and fluffy.
- You can substitute crushed peppermint candy with finely chopped candy canes if preferred.
- Chilling the pie for at least 2 hours helps it set perfectly and makes slicing easier.
- For a stronger peppermint flavor, you can add an additional ½ teaspoon peppermint extract, but be careful as it can be overpowering.
Nutrition
- Serving Size: 1 slice
- Calories: 350 kcal
- Sugar: 28 g
- Sodium: 200 mg
- Fat: 26 g
- Saturated Fat: 15 g
- Unsaturated Fat: 8 g
- Trans Fat: 0 g
- Carbohydrates: 25 g
- Fiber: 1 g
- Protein: 4 g
- Cholesterol: 65 mg


Leave a Reply