There’s something truly magical about the perfect blend of rich chocolate and refreshing peppermint — that’s exactly what you get with this Peppermint Cocoa Thumbprint Cookies Recipe. These cookies are as delightful to look at as they are to eat, and they bring a cozy holiday vibe right into your kitchen.

Jump to:
- Why You'll Love This Recipe
- Ingredients & Why They Work
- Make It Your Way
- Step-by-Step: How I Make Peppermint Cocoa Thumbprint Cookies Recipe
- Top Tip
- How to Serve Peppermint Cocoa Thumbprint Cookies Recipe
- Make Ahead and Storage
- Frequently Asked Questions:
- Final Thoughts
- Peppermint Cocoa Thumbprint Cookies Recipe
Why You'll Love This Recipe
I absolutely adore how this cookie recipe strikes a balance between simple prep and impressive flavor. The peppermint and cocoa are a classic combo, and using a sugar cookie mix keeps things quick without skimping on taste.
- Super Flavorful: Rich cocoa and bright peppermint come together in every single bite.
- Easy Prep: Using a premade sugar cookie mix speeds up the process and helps even baking beginners succeed.
- Fun Texture: The thumbprint filled with chocolate almond bark and crunchy candy canes adds a delightful contrast.
- Great for Gifting: These cookies look festive and taste like you spent hours making them—perfect for holiday treats.

Ingredients & Why They Work
Each ingredient here plays its role beautifully— the sugar cookie mix provides a reliable base, cocoa adds the deep chocolate flavor, and peppermint extract brings that fresh holiday twist. It’s straightforward but feels decadent.
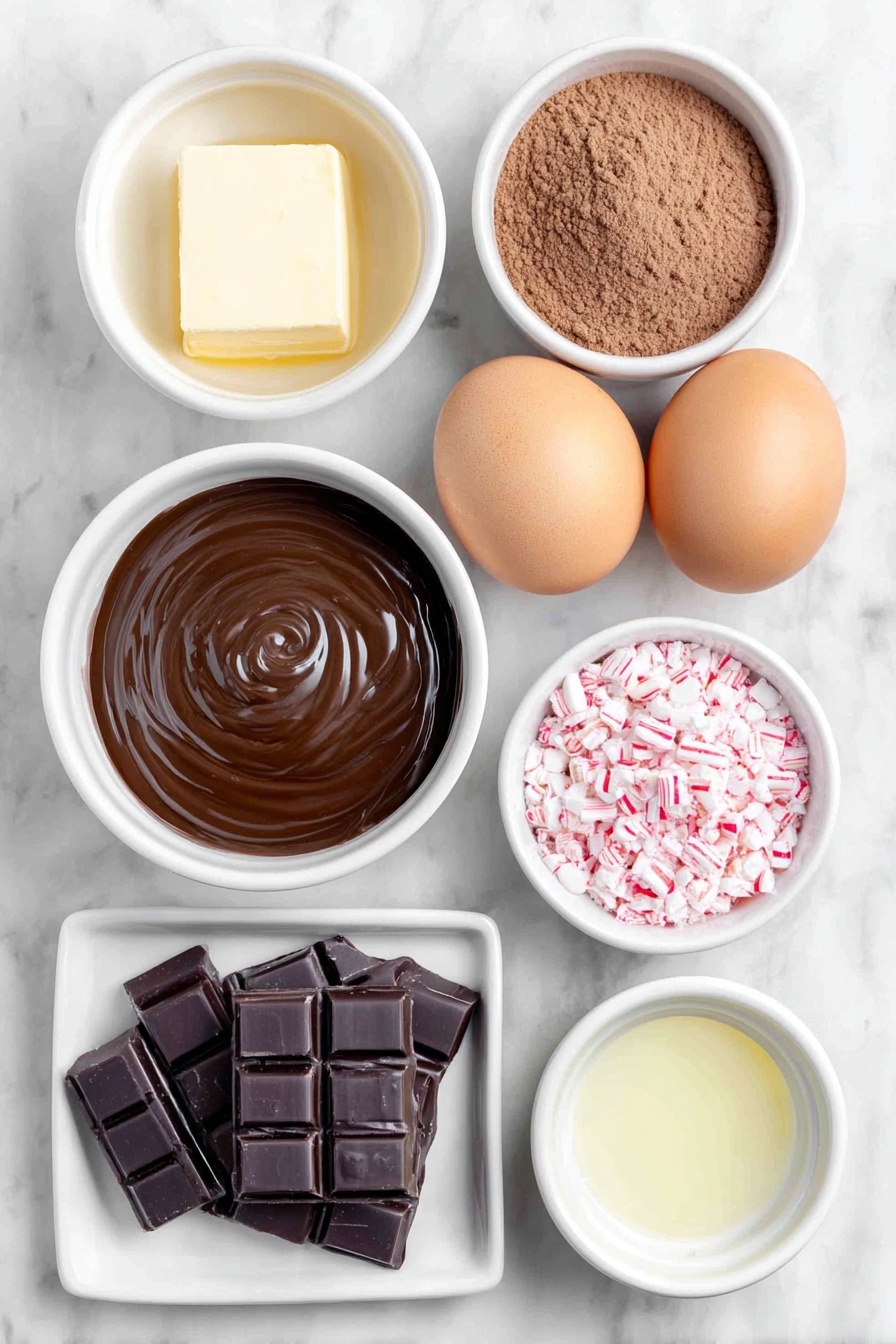
- Sugar cookie mix: This pre-mixed blend makes the dough easy to handle with consistent results every time.
- Salted butter: Adds richness and moisture; salted is preferred here to balance the sweetness.
- Cocoa powder: Unsweetened cocoa gives the classic chocolate taste without extra sugar.
- Eggs: Bind everything together and give structure to the cookies.
- Peppermint extract: The star flavor that lifts this cookie to festive perfection—be sure to use pure extract for the best taste.
- Chocolate almond bark: Melts smoothly to fill those thumbprint wells with luscious chocolate goodness.
- Crushed candy canes: Adds crunch and a burst of peppermint flavor as the perfect finishing touch.
Make It Your Way
While I love the classic peppermint and chocolate combo, this recipe is fantastically flexible. Make it your own based on what you have or your favorite flavors to highlight!
- Variation: I once swapped peppermint extract for orange extract, and the cookies turned out bright, refreshing, and unexpected—definitely worth trying if you're not a peppermint fan.
- Allergy-friendly: Try substituting butter with coconut oil and almond bark with dairy-free chocolate to suit dairy-free diets.
- Miniature cookies: Make the dough balls smaller for bite-sized treats perfect for parties or gift boxes.
Step-by-Step: How I Make Peppermint Cocoa Thumbprint Cookies Recipe
Step 1: Mix It Up Smoothly
Start by preheating your oven to 350°F. Then, grab a large mixing bowl and combine your sugar cookie mix, softened salted butter, cocoa powder, eggs, and peppermint extract. I like to use a hand mixer to get everything completely combined and creamy—no lumps allowed. If you mix by hand, just be sure to blend well, so the cocoa is evenly distributed and the dough looks smooth.
Step 2: Shape the Dough
Line your baking sheet with parchment paper—it helps with easy cleanup and stops cookies from sticking. Scoop the dough into 1-inch balls using a tablespoon measurer for consistency. Roll each ball between your palms until they’re smooth. Place them a couple of inches apart on your pan. Then, gently press an indent into the center of each ball with your thumb or a 1 teaspoon measuring spoon. This step is key to avoid cracking and create the perfect “well” for your chocolate filling.
Step 3: Bake and Re-Indent
Bake the cookies for 8–10 minutes until the centers start to set but are still soft. Once out of the oven, carefully press your measuring spoon again into the center of each cookie if the indentation has puffed up or become less defined—this ensures enough room for the melted chocolate without cracking.
Step 4: Melt and Fill with Chocolate
While the cookies cool, melt your chocolate almond bark in the microwave in short 20-second bursts, stirring in between until silky and smooth. Spoon the melted chocolate into each thumbprint well until filled completely. Then, quickly sprinkle crushed candy canes over the tops before the chocolate sets.
Step 5: Cool and Serve
Let the cookies rest for 3 to 5 minutes so the chocolate firms up but the cookies stay slightly warm and soft. Then, they’re ready to enjoy (or gift!). I love these still warm with a cup of hot cocoa during the chilly season.
Top Tip
Making thumbprint cookies can be tricky if you don’t have the right approach, but these tips from my own baking adventures will make your batch flawless every time.
- Indent Before Baking: Pressing the thumbprint before baking helps keep the well defined, so your chocolate filling fits perfectly.
- Handle Dough Gently: If cracks form while pressing, just carefully smooth the edges back together to keep cookies looking neat.
- Use a Measuring Spoon for Consistency: I prefer a small round measuring spoon over my thumb for uniform indentations and neater cookies.
- Crush Candy Canes Right: Smash candy canes in a sealed plastic bag with a rolling pin. It’s easier and gives chunkier pieces than a food processor, which dusts your candy into powder.
How to Serve Peppermint Cocoa Thumbprint Cookies Recipe

Garnishes
Besides the crushed candy canes sprinkled on top, I sometimes add a tiny drizzle of white chocolate or a dusting of powdered sugar for an elegant look. Fresh mint leaves can also add a great visual pop when serving for guests.
Side Dishes
These cookies pair beautifully with a warm cup of coffee, peppermint tea, or classic hot cocoa. For a festive spread, include them alongside fudge or a peppermint bark dessert tray.
Creative Ways to Present
When gifting, I love packaging these cookies in clear cellophane bags tied with a festive ribbon and a sprig of holly or cinnamon stick. For holiday parties, arrange them stacked on a pretty plate or tiered stand with some evergreen sprigs for the perfect seasonal touch.
Make Ahead and Storage
Storing Leftovers
Store leftover cookies in an airtight container at room temperature for up to 2-3 days to keep them soft and tasty. For longer freshness, refrigerate them where they’ll keep well for up to 4-5 days.
Freezing
If you'd like to save some for later, once completely cooled, freeze your cookies in an airtight container for up to 3 months. I personally wrap them in parchment first so they don’t stick together—makes thawing easier.
Reheating
To enjoy frozen cookies, thaw at room temperature until slightly warmed. If you like them extra cozy, pop them in a 300°F oven for a few minutes to soften the chocolate without overbaking the cookie.
Frequently Asked Questions:
Yes, you can use chocolate chips, but almond bark or melting wafers melt more smoothly and set up with a nice glossy finish. Chocolate chips may require tempering or may not harden as crisply.
Cracking happens if the dough is too dry or if you don’t make an indent before baking. Making your thumbprint indent before baking and gently smoothing any cracks will help keep the cookie shape intact.
You can reduce sweetness by using unsweetened cocoa powder and choosing a sugar cookie mix with lower sugar. Reducing candy cane sprinkles or omitting them also cuts down sweetness, while keeping the peppermint flavor.
Absolutely! Chilling the dough for 2-3 hours makes the dough easier to handle and helps the cookies keep their shape during baking, so you only need to press the thumbprint once after baking.
Final Thoughts
Honestly, this Peppermint Cocoa Thumbprint Cookies Recipe feels like a warm hug on a chilly day. I find myself baking them year-round—not just holidays—because the peppermint and chocolate combo is just that good. Try them out for your next baking day; I’m pretty sure they’ll become a staple in your cookie rotation too. Enjoy the process and, of course, enjoy every delicious bite!
Print
Peppermint Cocoa Thumbprint Cookies Recipe
- Prep Time: 15 minutes
- Cook Time: 10 minutes
- Total Time: 25 minutes
- Yield: 24 servings
- Category: Dessert
- Method: Baking
- Cuisine: American
Description
These Peppermint Thumbprint Cookies are a festive twist on a classic favorite, combining rich cocoa-flavored sugar cookie dough with melted chocolate almond bark and a crunchy crushed candy cane topping. Perfect for holiday gatherings, these cookies offer a delightful peppermint kick with a smooth chocolate center in every bite.
Ingredients
Cookie Dough
- 17.5 ounce package sugar cookie mix
- ½ cup (1 stick) salted butter, softened
- ½ cup cocoa powder
- 2 large eggs
- 1¼ teaspoons peppermint extract
Topping
- 8 ounces chocolate almond bark, chopped (about 1 cup or 4 squares)
- ¼ cup crushed candy canes
Instructions
- Preheat Oven: Preheat the oven to 350 degrees Fahrenheit to prepare for baking the cookies.
- Mix Dough: In a large bowl, use a beater to mix together the sugar cookie mix, softened salted butter, cocoa powder, eggs, and peppermint extract until the dough is completely combined.
- Prepare Baking Sheet: Line a sheet pan with parchment paper to prevent sticking during baking.
- Form Cookie Balls: Scoop 1-inch balls of dough using a 1 tablespoon measurer. Roll each ball between your hands to create a smooth surface and place them evenly spaced on the lined sheet pan.
- Create Indents: Use your thumb or a 1 teaspoon measuring spoon to press an indent into the center of each cookie ball. If cracking occurs, gently mold the dough back together.
- Bake Cookies: Bake in the preheated oven for 10 minutes or until the centers begin to set.
- Re-indent Centers: Remove cookies from the oven and carefully press the indents again with the teaspoon measurer to ensure they are well-defined.
- Cool Cookies: Allow the cookies to cool while preparing the chocolate almond bark filling.
- Melt Chocolate: Place the chopped chocolate almond bark in a microwave-safe bowl and heat in 20-second increments, stirring between each until fully melted and smooth.
- Fill Indents: Spoon the melted chocolate almond bark into the indents of each cookie until they are completely filled.
- Add Candy Cane Topping: Before the chocolate sets, sprinkle crushed candy canes on top of each cookie to add a festive crunch.
- Set and Serve: Let the almond bark cool and set for 3-5 minutes before plating. Serve the cookies while still slightly warm for the best texture and flavor.
Notes
- To store, keep cookies in an airtight container at room temperature for 2-3 days or refrigerate for 4-5 days to prolong freshness.
- For longer storage, freeze completely cooled cookies in an airtight container for up to 3 months. Thaw at room temperature before serving.
- Crush candy canes by placing them in a plastic bag and smashing with a rolling pin for larger pieces, or use a food processor for finer pieces (which creates more powder).
- Make dough balls slightly smaller than 1 inch to yield more cookies, as the dough expands slightly during baking.
- To avoid making the indent twice, chill the dough for 2-3 hours before baking to help cookies keep their shape.
- Use a round measuring spoon about 1 teaspoon in size to create perfect uniform indentations instead of your thumb.
- Follow this recipe's mixing and baking method rather than instructions on the cookie mix packaging for best results.
Nutrition
- Serving Size: 1 cookie
- Calories: 150 kcal
- Sugar: 14 g
- Sodium: 90 mg
- Fat: 8 g
- Saturated Fat: 4.5 g
- Unsaturated Fat: 2 g
- Trans Fat: 0 g
- Carbohydrates: 19 g
- Fiber: 1 g
- Protein: 2 g
- Cholesterol: 25 mg


Leave a Reply