There's something about a sweet, festive treat that instantly lifts the spirits, and this White Chocolate Candy Bark with Festive Candies Recipe does exactly that. It's creamy, colorful, and just the right balance of chewy and crunchy—perfect for sharing or sneaking a few pieces when no one’s looking!

Jump to:
- Why You'll Love This Recipe
- Ingredients & Why They Work
- Make It Your Way
- Step-by-Step: How I Make White Chocolate Candy Bark with Festive Candies Recipe
- Top Tip
- How to Serve White Chocolate Candy Bark with Festive Candies Recipe
- Make Ahead and Storage
- Frequently Asked Questions:
- Final Thoughts
- White Chocolate Candy Bark with Festive Candies Recipe
Why You'll Love This Recipe
I fell for this white chocolate candy bark the first time I made it because it’s both ridiculously easy and incredibly festive. Plus, it’s flexible—you can tweak it based on what candies you love or have around, making it a perfect holiday go-to!
- Quick & Simple: It requires just a few ingredients and minimal prep, so you can whip it up even on busy days.
- Customizable: You can swap or add festive candies to match your taste or occasion.
- Visually Stunning: The colorful gumdrops pop against the creamy white chocolate, making it irresistible.
- Great for Gifting: It stores well and makes a thoughtful, homemade present during the holidays.

Ingredients & Why They Work
Each ingredient in this White Chocolate Candy Bark with Festive Candies Recipe plays a role in giving you that perfect texture and flavor balance—smooth white chocolate melts into chewy marshmallows, offset by bursts of sweet, fruity candies.

- Butter: Adds a luxurious richness and helps smooth the melting process for the white chocolate.
- White chocolate chips: Use good-quality chips for the creamiest flavor and easiest melting.
- Mini marshmallows: These soften slightly when melted, contributing a subtle chewiness to the bark.
- Red and green gumdrops or chewy candy (chopped): These festive candies add color, flavor variety, and a chewy texture contrast that’s so fun.
Make It Your Way
I love changing up the candies depending on the occasion and what I have in the pantry. You can get creative here—try peppermints for a winter twist, or include nuts and dried fruit for some unexpected crunch and chew.
- Variation: Once, I swapped the gumdrops for crushed candy canes—hello, minty freshness! It instantly made the bark feel more seasonal and exciting.
- Dietary tweaks: If you prefer dairy-free, look for white chocolate that’s vegan-friendly or use white chocolate-style coating alternatives.
- Flavor boosters: A sprinkle of sea salt on top before chilling can enhance the sweetness and add a little salty-sweet magic.
Step-by-Step: How I Make White Chocolate Candy Bark with Festive Candies Recipe
Step 1: Prepare Your Pan with Care
Start by lining an 8x8 baking dish with parchment paper. I lightly grease it too so the bark lifts out easily later. This small step saves you so much frustration—it practically guarantees smooth removal without cracking.
Step 2: Melt the Magic
In a large microwave-safe bowl, combine butter, white chocolate chips, and mini marshmallows. Microwave for 1 minute, then stir with a greased spatula to keep things from sticking. Continue microwaving in 30-second bursts, stirring each time, until the mixture becomes silky smooth. Patience here is key—don’t rush or overheat or white chocolate can seize.
Step 3: Fold in Your Festive Candies
Let the melted mixture cool for about a minute—that keeps the candies from melting completely when folded in. Gently fold in your chopped red and green gumdrops or any festive chewy candies you love. This keeps the texture vibrant and flavorful.
Step 4: Shape and Chill
Transfer the mixture to your prepared dish and press it down evenly with a spatula. Cover with plastic wrap and pop it in the fridge for at least 4 hours or overnight. This solidifies the bark and lets those flavors meld beautifully.
Step 5: Slice and Enjoy
When it’s firm, carefully lift the bark out using the parchment paper. Peel away the paper and cut the bark into bite-sized pieces. I find smaller pieces keep everyone reaching back for just one more—because it’s that irresistible!
Top Tip
From my experience making this White Chocolate Candy Bark with Festive Candies Recipe multiple times, a few little tricks make a big difference. They help keep the process smooth and the results irresistible.
- Use a greased spatula: When stirring melted white chocolate, a bit of butter or spray on your spatula prevents sticking and makes folding easier.
- Don’t rush cooling: Let the mixture cool just enough before adding candies to keep their shape intact.
- Choose quality white chocolate: Good-quality chips or bars melt more smoothly and taste richer than cheaper versions.
- Chill long enough: While 4 hours works, overnight chilling always gives firmer bark that's easier to slice cleanly.
How to Serve White Chocolate Candy Bark with Festive Candies Recipe

Garnishes
When I serve this bark, sometimes I like to sprinkle a few extra whole gumdrops or mini marshmallows on top before chilling, so your presentation pops right from the start. Edible glitter can also add that extra holiday sparkle if you’re feeling fancy!
Side Dishes
This sweet bark goes wonderfully alongside a hot cup of cocoa or a rich coffee, balancing warm, cozy drinks with the cold, creamy sweet. For holiday parties, I pair it with other simple treats like spiced nuts or fresh fruit platters to offer contrast.
Creative Ways to Present
For gifting or parties, I arrange the bark pieces in a festive tin lined with parchment or cradle them in mini cupcake liners for individual portions. Wrapping small bundles in clear cellophane tied with ribbon is another crowd-pleaser and looks charming on dessert tables.
Make Ahead and Storage
Storing Leftovers
I store leftovers in an airtight container at room temperature or the fridge, depending on how warm the kitchen is. It stays great for about a week, and keeping it airtight helps the bark maintain its texture without getting sticky or stale.
Freezing
Freezing works well for this bark! I place pieces in a single layer on wax paper in a freezer-safe container to prevent sticking. It can last up to 2-3 months frozen and thaws quickly at room temp when you’re ready for a treat.
Reheating
This bark isn’t meant to be heated, but if it softens too much in your hands, just pop it back in the fridge for a bit before serving again. That helps it regain firmness and the right bite.
Frequently Asked Questions:
Yes! You can swap white chocolate for dark or milk chocolate for a different flavor twist. Keep in mind that the final look and sweetness will change—dark chocolate is less sweet and will create a richer bark.
Use a sharp knife and cut the gumdrops into small, even pieces to ensure they mix well into the bark and remain chewy. You can slightly dust your knife with powdered sugar to prevent sticking.
Absolutely! The basic ingredients in this bark are naturally gluten-free, but always check your candy labels to ensure there are no gluten-containing additives.
Stored airtight in a cool place or fridge, this bark stays fresh for about a week. For longer storage, freezing is a good option and it retains its quality well for 2-3 months in the freezer.
Final Thoughts
This White Chocolate Candy Bark with Festive Candies Recipe holds a special place in my holiday traditions because it’s so simple yet brings big smiles. It’s the kind of treat you can make with kids or friends, making memories as you go. I truly hope you enjoy making and sharing it as much as I do—you’ve got a little piece of festive joy waiting to happen with this one!
Print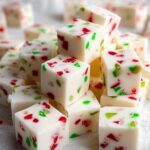
White Chocolate Candy Bark with Festive Candies Recipe
- Prep Time: 20 minutes
- Cook Time: 0 minutes
- Total Time: 4 hours 20 minutes
- Yield: 24 servings
- Category: Dessert
- Method: No-Cook
- Cuisine: American
Description
This festive Christmas Candy combines creamy white chocolate, gooey marshmallows, and colorful red and green gumdrops for a sweet, bite-sized treat perfect for holiday gatherings and gift-giving.
Ingredients
Main Ingredients
- 2 tablespoons butter
- 12 ounces white chocolate chips
- 10 ounces mini marshmallows
- 1 cup red and green gumdrops or chewy candy, chopped
Instructions
- Prepare the Baking Dish: Line an 8x8 inch baking dish with parchment paper and lightly grease it to prevent sticking. Set aside for later use.
- Melt Ingredients: Combine butter, white chocolate chips, and mini marshmallows in a large microwave-safe bowl. Microwave for 1 minute, then stir with a greased spatula. Continue microwaving in 30-second increments, stirring after each, until the mixture is completely melted and smooth.
- Cool and Fold in Candy: Let the melted mixture cool for about 1 minute to slightly thicken, then fold in the chopped red and green gumdrops or chewy candy evenly throughout the mixture.
- Shape the Candy: Transfer the candy mixture into the prepared baking dish. Use a spatula to press it into a flat, even layer for uniform candy pieces.
- Chill: Cover the baking dish with plastic wrap and refrigerate for a minimum of 4 hours or up to overnight to allow the candy to set firmly.
- Slice and Store: Once set, lift the candy out by the parchment paper, remove the paper, and slice into small bite-sized pieces. Store the candy pieces in an airtight container to maintain freshness.
Notes
- You can substitute white chocolate chips with white candy melts if preferred.
- For a different texture, try using crushed peppermint candies instead of gumdrops.
- Make sure to stir the melted mixture frequently to avoid burning or scorching the chocolate and marshmallows.
- Store candy in a cool, dry place to prevent melting during warmer months.
- This recipe is ideal for making ahead and gifting during the holiday season.
Nutrition
- Serving Size: 1 piece (approximate)
- Calories: 120 kcal
- Sugar: 15 g
- Sodium: 30 mg
- Fat: 6 g
- Saturated Fat: 4 g
- Unsaturated Fat: 2 g
- Trans Fat: 0 g
- Carbohydrates: 18 g
- Fiber: 0 g
- Protein: 1 g
- Cholesterol: 10 mg


Leave a Reply